LET'S MEET ONLINE

LET'S MEET ONLINE! Call (512)560-2609 or email helpimnotageek@gmail.com and set up a time for a session. It works really well. We talk on the phone while I see your screen.
Showing posts with label settings. Show all posts

Friday, October 23, 2015

My Mailbox is Full - Now What?


Most email messages don't take up lots of space. What does take a lot of space is images which can be in advertisements or as attachments in messages from friends and family. 

One first step would be to create folders for the email that you want to keep and to delete the ones you do not want to keep. When you delete mail it goes into the TRASH folder of your email. Mine is set to empty automatically every 30 days, so that keeps space from filling up. 

Since every email program is set up a little differently here are a few tips to help you set up folders.

  • Look for the words "Manage Folders" 
  • In Gmail folders are called Labels and in order to make a new one you have to open an email message first. At the top of the screen next to the word "more" is a picture of a Label.
  •  When you click that it gives you an option of putting the message in a label already created or creating a new one. When you create a new one it shows up on the left side of the email page.
  • To check how often your trash empties or if it empties automatically look for a GEAR and click on it. Somewhere in the list that comes up you will see "settings"
  • Click on Settings and look for the trash settings. Change them to what you want them to be.
In Gmail folders are called Labels

This is a Gear. you can find Settings when you click the Gear.

One other thing you can do is to save email that you want to keep to your computer and delete it from your email. This is called Archiving your mail. In Gmail when you click to archive your mail you can find it again by searching or if you open All Mail. It is stored on the Google server and there is lots of space for it to go to.

In Outlook you can actually create a file to hold your archived mail. Right click on the "On My Computer" heading at the bottom of your folder list and choose New Folder. Name the folder Archived Mail or something like that. Now you can move messages into that folder or create a Rule that will automatically move messages to the archive after a certain time. 

Setting up a rule is also called filtering in Gmail. In some email setting up Rules is under the Tools menu. In others you will find the words "filter" or "rules" in the Settings. A rule is a sentence like  "When a new mail arrives"__________________ and then it gives you several choices for what to do with that message, like "move to archive folder" You also usually have to fill in a few more things like when it should be done (i.e. after 120 days) Once you have the rule created you usually have to click to enable it.

With Gmail archived messages can be found by clicking on All Mail. All Mail getspretty full, so you may have to search for the message that you archived using a word from the message or the email address of the sender. With Outlook you are moving your messages from the server to your own computer. You should be able to find the folder called Archive in your Documents folder.

If you have a lot of mail with photos that you want to keep it is better NOT to keep the photos in your email. When you get a picture in an email message you can right click on it and choose Save Image or Save Target. Your computer will open up a window and you can choose the Picture file for your photo to be saved in. Be sure to rename it because pictures are often named things like img566.jpg and you will not be able to tell by the name what it is later. 

Once you have saved all of the photos from your email, delete the messages and it will create more space.

Friday, August 29, 2014

My Phone is full of Pictures, Now What?

Recently several of my clients have had the same problem. All of them had iPhones, loved taking pictures and video and had gotten to the point where they could not update the operating system or add apps because they kept getting the message from their phone that there was not enough memory. They did not want to delete any of their pictures. 


You can check the memory of your phone this way: 


  1. From the start page choose settings
  2. Open General
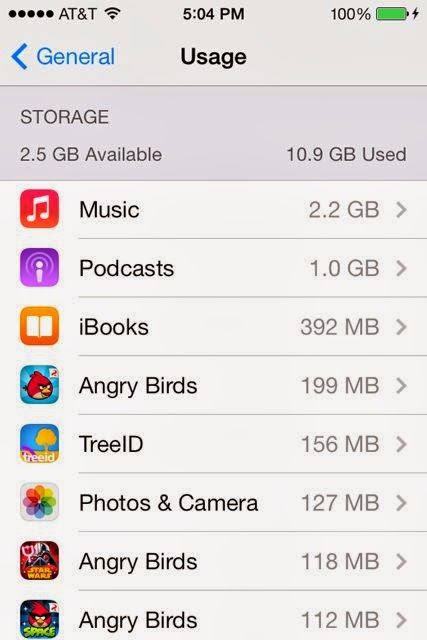
  3. Slide down until you see Usage and click on it.
  4. Your phone will tell you how many GB are available and how many you have used. Then it lists the apps on your phone in order of how much space they are taking. From here you can see what is taking the most space on your phone and decide what you might want to remove.
If you are sure that it is pictures and videos that are taking up too much space you may want to find another space to save them. On your computer you probably have a built in software for storing and editing your photos. iPhoto is the main one for Mac, but there is also Picasa. PCs come with Windows Photo Gallery. Each of these programs allows you to organize your pictures in different ways so that they are easy to find. 

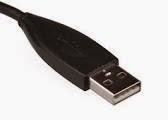
First you will need a USB connector that goes from your phone (or camera) to the computer. Once you have plugged in your iPhone (or other SMART phone) to your computer and turned it on your compute should notice it and a screen should pop up asking what you want to do with the files that are on the device you just plugged in. You want to MOVE them to your computer from the iPhone. When you have chosen to do this a window will pop up and there will be a place to check that you want them to be deleted from your phone when they are transferred to the computer. Your computer should show you the process of transferring the pictures and then the process of deleting them from your iPhone. 

Now your iPhone has new space and your photos are all in a place where you can edit them and sort them in different ways easily. 

Having a program that will store your photos online as well as on your computer is really helpful. If something happens to your computer you will not lose all of your photos. iPhoto, Picasa and Windows Photo Gallery all have ways that you can sign up to have your photos stored online. They usually give you a bit of space free (3-5 GB) and then charge you for space beyond that. 

DELETE ON YOUR PHONE

On your phone you can delete photos and video without downloading them. You can also delete them if you have already downloaded them to your computer and didn't want to erase all of them from your phone. 
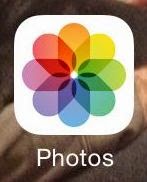
Start by going to the Photos button on your phone. When you click on it your collection of photos shows up. You can see them in many different ways. For this you want to choose "photos". 


In this view they are organized by date. The first view is to see them by year. 


If you choose one of the years it will open to something called Collections. These are organized by date or place. 


If you click on one of those they are now organized as Moments. When the are in this arrangement you can see the word SELECT on the top right corner. 


If you click it the word SELECT appears at the top right of each of the groups of pictures. You will also see that there is a trashcan at the bottom right of the screen. You can select whole groups of photos or only the ones you want to delete. When you have selected more than one you will see the trashcan become blue. Now when you click it the pictures are gone.


Tuesday, February 25, 2014

Arranging the Icons on your iPhone or iPad

The iPhone and iPad are amazing. There are so many apps that eventually you have too many and it is difficult to find anything. In this post I will go over several ways that you can organize your apps so that they are easier for you to find.

ON THE PHONE

1.  Alphabetical Order

You can only organize the apps that you have downloaded and added to your iPhone or iPad. The ones that come with the phone cannot be changed.  Go to:
              • Settings 
              • General 
              • Reset 
              • Reset Home Screen Layout
Now all of your apps, except the ones that came with the phone are in alphabetical order. If you like it this way you will have to redo this each time you download an app because they download to the first empty space or to the end rather than in alphabetical order.


2.  Putting them in Folders

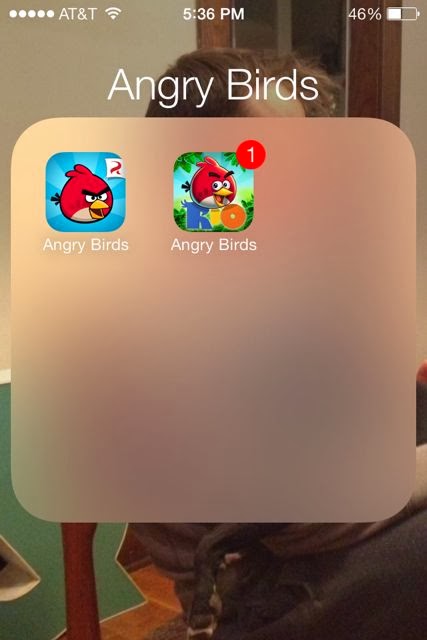
It is possible to put your apps into folders so that you can sort them into types. You can name the folders yourself.


        • Hold down one of the icons until they all have x's and shake.
        • Drag one of the apps onto another one that you want in the same folder.
        • Click the name at the top of the folder window and erase the name that is there and type what you want it to be.
        • It will be the same size as the icons before, but when you click on it the folder opens to reveal all of the apps inside.

3.  Pages by subject

At the bottom of the iPhone window above the bar with the programs that do not change when you go to a different page of icons there are dots. Each dot represents a page of apps. When you swipe the dot that represents the page you are on becomes bold.

Some people like to organize their apps by making each page one of their categories. They might put all games on one page or all music apps on another page.


ORGANIZING ONLINE


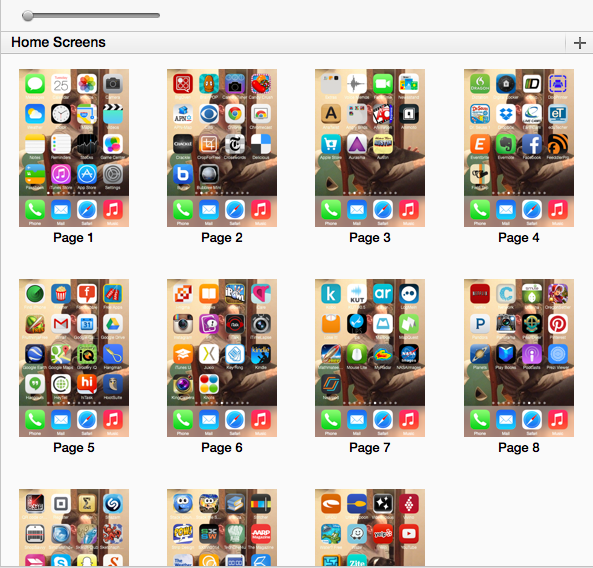
Probably the easiest way to organize the apps is in iTunes on your computer with your iPhone or iPad plugged in because the icons are larger and you can use your mouse. 

  1. Plug your iPhone or your iPad into the computer that you use for syncing.
  2. Go to the iTunes Program and you can see all of the pages of your apps at one time. 
  3. Now using your mouse you can do the same organizing that you were doing on the phone before. You can drag apps from place to place and create folders or pages with your organized apps. When you are finished click on apply at the bottom to make sure to  have the same set up on your phone.
  4. The only thing that is more easily done on the device than on the computer is alphabetize the apps. Remember that alphabetization will not reorder the default apps that came with your phone. 

ON THE IPAD

The iPad works in the same way that the iPhone does and so if you follow the directions above they will help you to organize your iPad

I cannot help you with your Android or Windows devices because I am not sure if they work in the same way or not.

RUNNING OUT OF SPACE? 

I recently had to do an update to my phone and the message it sent me was that it could not download the update because there was not enough empty space on the device. 


The way to deal with that is to open your phone and go to SETTINGS.  In SETTINGS choose GENERAL

In GENERAL choose USAGE. This will give you a list of all of the apps that are on your iPhone or iPad and then you can look through the list to decide if there are apps on there that you never use.


Remember that on your computer you have a comprehensive list of everything you have had on your iPhone.  It keeps track of the apps that you have removed. You can always add them back in without paying for them again if you paid or if they were free!  

Monday, September 30, 2013

OK I'm ready for an iCalendar, now what?

There are so many different types of calendars and devices to talk about and I am not an expert in all of them, so this time I will tell you a story about how I solved my calendar problems and then give you a few tips about how to export a calendar from one type of online calendar and import it into another.
If this does not answer your questions maybe the links below will help you. You can always go to Google and just type in your question. Most often a lot of links will show up with discussions from people who have had the same problem as you have and often there is a solution you can use.

Using the Calendar in iPhone
I started by using my iPhone Calendar regularly. All of my appointments were on my iPhone. Here is what I do.
1. Click on the Calendar icon on my Phone.

2. Find the date that I am wanting to put something onto. This has changed with OS 7.  Here are some screen shots of how I go through it.
  • Click on Today in the bottom corner to get back to today's date. 
  • Click on the name of the month at the top of the page and scroll down to find the month that I want.
  • Click on the calendar of the month that you are wanting.
  • Click to choose a date that you want to put something on.


  • Click on the + at the top right side to add an event. 
  • Fill out the event information (remember that there is more you can put in if you scroll down)
  • Click on DONE on the top right when you are done.
The Event Details will appear. It will show what you have put in as well as which calendar it is on.

To Delete an event click on it and when the Event Details appear click EDIT on the top right side and scroll down until you see the red delete button. Click it and the event is gone.

Syncing that Calendar with the Google Calendar
Now that I had the events on my iPhone I wanted to be able to see them on my Google Calendar. I can get to a Google Calendar where ever I am, even without having my own computer. There were two things that I needed to do in order to make my events show up on Google Calendar.

1.  I followed the directions on this link: https://support.google.com/calendar/answer/151674 which made sure that my Calendar was set up correctly. I named the calendar that I wanted to sync "Google Calendar" and gave it a different color than other calendars so that I could see what was happening.

2.  I went back to the calendar on my iPhone and went to the appointments that I wanted to show up on the Google Calendar. I clicked on the event and on the event details looked to the part that told me which calendar it was on. Most of mine defaulted to HOME and had blue dots, so I clicked on the word HOME and switched it to Google Calendar.  When I changed the Calendar they began to show up on my Google Calendar on the computer.


Sharing Calendars with Other People
I thought it would be good to have my husband's events on my calendar so that I could keep up with what he was doing. In order to do that in Google

  • On the computer open up and sign into your Google Calendar
  • Click on the Gear on the top right side and slide down to the word SETTINGS
  • Click on the tab at the top that says CALENDAR
  • Click on the link under Sharing.


  • Look for Share With Specific People.
  • In that box type the names of the person you want to share your calendar with. 
  • You can share your calendar with more than one person.

  • They can opt to have your calendar show in a different color on their calendar or not to show. 
Finally, How to Export and Import your Calendar
This may help you if you want your events to go into a calendar that is not compatible with the Google calendar or another calendar that you have. Instead of using SAVE like you do with a document you choose EXPORT. 

EXPORT is usually found under the File Menu, but in Google Calendar it is in the settings.

This exports the file into a format that can be opened by most calendars. One of the formats that is used is .CSV It cannot be clicked on and opened up as a calendar (it may open, but will look like a mess or not open at all. What you need to do is to IMPORT it into another calendar program.

Open the other program and under file look for the word IMPORT. When you choose IMPORT a window opens like when you want to open a file. Find the file that you just EXPORTED and choose it. The calendar program will open it up and you should have all of your calendar items on the new calendar. 

This can also be done with your CONTACTS or ADDRESS BOOK. With most programs you can EXPORT your contacts and then IMPORT them into another address book program. 

IMPORTANT NOTE - This is not the same as syncing your calendar or address book. You are only moving over the things that were entered in the past. It will not continue to update as you update the old one. 

OTHER RESOURCES

Google Support
https://support.google.com/calendar/answer/151674?hl=en

https://support.google.com/mail/answer/3008051

About.com
http://email.about.com/od/googlecalendartips/qt/Sync_Google_Calendar_and_iPhone_Calendar.htm

Digital Trends
http://www.digitaltrends.com/mobile/sync-multiple-google-calendars-on-iphone-or-ipad/

Thursday, January 24, 2013

Facebook-Constantly Changing

I guess Facebook has to keep changing in order to be responsive to all of their customers. It can be frustrating to think that all your privacy settings are set up and then to find out that Facebook has changed around how it works. Recently, it seems to me that they have been trying to figure out how to make your experience using Facebook more secure without losing all of the possibilities for networking that is the central purpose of the program.

I just read an article from USA Today (a paper that I usually do not take too seriously) at 
http://www.usatoday.com/story/tech/columnist/komando/2013/01/18/kim-komando-facebook-settings/1827413/ 
It was sent to me by a friend and the article did have several good recommendations. One overall suggestion is that it is good to check your privacy settings every once in a while to be sure they are how you want them to be. 

Facebook has added a new link to the right of your name at the top that looks like a lock with three lines next to it. When you click on it and the window opens up you can answer three questions. Who can see my stuff?, Who can contact me? and How do I stop someone from bothering me? Under these three questions is the link to See More Settings. When you click this it will bring you to a place where you can go into each one of your privacy setting areas and make changes. To make a change to them you click on the EDIT link, type in your changes, and then close the window. 


There is also a link here for looking at your own profile so you can see the way it looks to someone else who comes to your page. That is really helpful because you can get a feel for what people are seeing about you and decide whether you want to be more private or more public. 

To get there go to your privacy settings and look for the words "view as" in this view you will be able to see what people coming to your page see and also check if it is different for the public, your friends and friends of friends.

I suggest you take some time to click through these things and see what you think about the way your Facebook is set up. If this does not make sense to you or you have more questions please do add them as comments to this post and I will get back to them.


Tuesday, December 11, 2012

Security Settings for Kids


One cannot protect their kids from every harm that may come to them. The most important thing is to love them and to be there for them. However, there are a lot of things that you can do as a parent to minimize the problems they might have online and to maximize your time and communication with them about how they spend their time online.


PLACEMENT OF THE COMPUTER
Do not set up a computer in your child's bedroom. All computer devices should be used in the central part of the house where anyone could see what is on the screen. You should be able to casually walk by and see what is happening on the computer. 

COMPUTER SET UPAll computers and devices have ways to set up different identities with different rights. If there is a family computer that several people use, set different personal log ins for each person. Each log in will have a different password so that your identity will not be available to your kids. On their identity you can set it up so that they cannot download or purchase items. You can also adjust the level of different things like sex or violence that is allowed. Remember that this is not perfect. There are always things that cannot be controlled.

BROWSER SETTINGS
All browsers (Internet Explorer, Firefox, Chrome, Safari, etc...) have settings that you can change that block out certain websites from searches. 

COMMON SENSE MEDIA  
http://www.commonsensemedia.org/
Common Sense Media is a non profit organization that reviews media (movies, TV, apps, books, games, websites, and music). They are very clear that they do not tell you what to think, but give you a way to decide what you think about different things. They are for media-sanity not censorship and their webpage says,"We can't cover their eyes, but we can teach them to see." The emphasis here is on discussion and understanding rather than blocking certain things. One parent I  know said that after a while his daughter went directly to Common Sense Media to read the reviews before asking if she could go to a certain movie.
Each item is rated on these things:
  • Positive Messages
  • Role Models
  • Violence
  • Sex
  • Language
  • Consumerism
  • Drinking, Drugs, Smoking

It is easy to browse by many different qualities:

  • Age of Kids
  • Type of Entertainment (movie, game, app, etc...)
  • Genre (action, comedy, etc...)
  • Topics (dinosaurs, magic, sports, etc...), and more.

There are also  many advice articles and videos on things like screen time, multitasking or keeping kids safe online.

COMMON PROBLEMS AND SOME IDEAS

1. Sharing too much information with others - Have talks with your children about the importance of not sharing personal information online. The law says that children must be at least 13 before signing up for different sites on the Internet, but the responsibility for that is put on the companies offering services. Usually they just have a place where the person registering has to enter their birthday. It is quite easy to enter a birthday that makes you old enough to register.  Talk to your children about this and make sure that they have your approval before signing into any sites. Facebook is a good example. You can tell your children that they cannot have an account until they are 13 and make the point that it is not your rule, but actually a law. Once they do sign up think about having access to their account (their password) so that if it is necessary you can access it. You don't want to be constantly "spying" on them, but there may be an occasion where it would be helpful to have that access.

2. Getting into forbidden spots on the Internet - First set up whichever browsers you use (or all browsers on your computer) to the settings that you want for your children. Then be sure that they are aware that EVERYTHING they do on the computer is recorded. It is possible to trace back where they  have been and what they have done. One simple way that you can do this is to check the History on the Browser. In Firefox this is one of the menus at the top of the screen. Beware though, the history can be deleted. All of the information is findable by a specialist at a cost, but it is not as easy.

3. Downloading copyrighted material - According to current Copyright Law everything published on the Internet (or anywhere) is copyrighted. It is NOT OK to save images or copy and paste someone else's text without asking permission. There are ways to find images through Flickr, Google, and many other places that are marked with a Creative Commons license. This is a type of copyright that allows you to use the work for different uses without asking. Usually the license spells out what you can use and what you can do with it. If there is something that you want to use that is not licensed with Creative Commons you can email the owner and most of the time they are flattered and will let you use it. Wikimedia is a great place to look for pictures that can be used!

4. Using the Internet to do schoolwork - Caution is the main thing to use here. The world has changed and new information is discovered and published on the web every day. It is a terrific place to learn all kinds of things. Wikipedia, for example, is a great place to find lots of information. However, it can be inaccurate. It is true that ANYONE can add to an article in Wikipedia. It is also true that it is constantly being curated by thousands of energetic people who want it to succeed. The only way to be sure about accuracy is to "triangulate" or find two other places that have the same information.  Help your kids to be careful about what they trust on the Internet and to be able to "read" where a webpage comes from or who wrote it.


Common Sense Media has a  Holiday Gift Guide
http://www.commonsensemedia.org/guide/holiday-gift-guide-2012

Saturday, November 5, 2011

Changing the Language on Your Computer

Computers allow you to change all sorts of things in order to make them easier for you to use.  Each thing that you change only changes SOME of the programs on your computer.

This post will at least show you where to go to change the language. Knowing that it can be done is the first step.

You may need to go into each of the programs that you want to use and change the language that it uses. The way this is done varies with each program, but there are a few things that are the same. The instructions below should get you started. As usual, if you have anything to add to what is here please put a comment so that we can all learn from each other.

ON A MAC
On a Mac all of the controls are in the System Preferences.

  1. The best place to find these is to click on the Apple at the top corner of the screen. On my computer it is black, but it can also be a rainbow apple. 
  2. Look for the word System Preferences in the window that comes down.
  3. When you choose System Preferences you will see that in the top row you have a choice called Languages and Text.

  1. When you open this up it will give you lots of choices for how you want your computer to communicate to you.
  2. Down below that you will see something called "Universal Access". This is where you can change the size of the font and the color of the screen. You can also make it so that your computer talks to you and change the speed of the keyboard and the mouse.
3.  On the top row is a button called Languages and Text. Click on this to set the main language for your computer to use. 
4. Once you have clicked on it you can drag the language you want your computer to show to the top of the list. You can also change several other things that have to do with language here, like what characters show up when you type or what format is shown for money or time.
On this blog there is an arrow on the top right that lets me change the language that it shows up in and it changes right away.

ON A PC


On a PC all of the set up items are found in the Control Panel.  Click on the Start Button or picture of windows on the bottom left corner. On the right side you will see the words Control Panel.
In this window you will be able to change the LOCATION which tells the computer that you are in a different country. Your time will change on the clock. Then you can choose the tab at the top of the page Keyboards and Languages. Here you can choose to change the default language for input. 
When you open the Control Panel one of the choices is Clock, Language and Region. 


Click on that choice and then choose Region and Language. 


 Once you have set your main languages there is a language bar that shows up at the top and you can switch back and forth.


 When I changed the language settings on my computer it seemed to change the languages on most of the webpages in Internet Explorer.


It also changed the way that words showed up in the controls of my computer.