In order to write this post I looked on line at several pages and I have tried to note below the URLs of the pages that I consulted. You may find more information at these places, but here is a summary with a few additional thoughts from my experience.
Check your usage
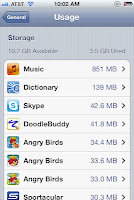
Before you start it is helpful to actually know how much memory you have and how much is used.
- Open Settings and tap on “General”
- Tap on “Usage” and look for the storage available and storage used data points at the top of the installed app list.
Before clearing anything off mine says 2.3 G available, 11.3 G used (the example I show is from the article). I think mine is OK. One of the articles I read said that you should always have more than one G available. if your available amount is in MB you need to clear off some stuff.
Scrolling further down you’ll
find how much space individual apps use. This is really helpful because you may find that apps you do not use take up a lot of space. Any apps that you delete from the Phone can be reinstalled for free if you want them back.
1. Delete Pictures
 Make sure first that you have downloaded any pictures that you want to save to your computer. If you have a Mac with iPhoto it is easy. You can just plug in your phone and choose iPhoto. It will show your phone on the left side and then you can download any photos that you want to keep by choosing them and then choosing "download selected". You will be asked if you want to take them off of your phone. OR you can choose "download all" and all of your photos from your phone will be downloaded. It helps me to download them in groups because I don't do it often enough and so there are usually several events with pictures. I give them a name, choose the photos and click download selected. I choose delete from iPhone because I do not want to have all of those photos on my iPhone. Later I create albums of certain photos on my Mac and then put them onto my iPhone.
 If there are photos on your iPhone that you do not want to have there you can go to Image Capture in your Applications Folder with your iPhone plugged in. It will show all of the photos that you have on the phone. You can choose the ones you do not want OR all of them and press the circle and line icon to delete them.
You also may have something called a PhotoStream turned on. This is a record of all of the pictures that you have taken. To turn it off go to SETTINGS and choose PHOTOS. In the Photo settings you can turn on or off the PhotoStream. If you turn it off it automatically removes all of the pictures that were in the PhotoStream in the first place which saved me LOTS of space.
I am not including instructions on how to do this on a PC because there are so many different ways. You may use Flickr, Picasa, or some other software. These are all free and are great ways of saving your photos.
2. Change the format of the music you have
"A little-heralded feature of iTunes 9.1 (My addition: The version of iTunes on your computer is the same that is downloaded to your device, so to find out the version go to your computer and look under iTunes>About and it will tell you what version. Mine is 11.0.1.) is the ability to convert higher bitrate songs to 128kpbs AAC files for iPhone or iPod Touch sync with iTunes. How do you do it? It’s a simple check box option in the Summary tab when your iPhone appears in the iTunes source list. When the box is checked, on the next sync, all your songs on your iPhone that are not 128kpbs AAC files will be removed and then re-added, being converted on the fly.
The first time I did it, about 400 songs on my iPhone needed to be converted. It took about ten minutes to do the conversion. Once the first large conversion is done, the iPhone syncs your music as fast (or slow) as it ever did (unless you’re refreshing your iPhone’s library every time you sync). If you keep “convert higher bitrate songs to 128kpbs AAC files” checked, any new songs added to your iPhone will automatically be converted.It’s important to note that this on-the-fly conversion does not alter your original files inside your iTuneslibrary — those will remain at whatever bitrate and in whatever file format you had them in.How well does this work? I saved a whopping 1.5GBs of space on my 8GB iPhone. Others here at TUAW saved between 2-5GBs. Of course, how much space you save will be dependent on what bitrate and file type your songs are now."
Make sure to click on APPLY on the bottom of the screen after you make the changes. On mine it did take a while to download the new versions. I had 352 songs. Now I have 2.6 G available and 11 G used. I saved .3 Gigabytes or 300 Megabytes... not a lot, but some.
You an always just delete the Music you do not listen to temporarily. It is stored in iTunes and can be added back easily.
3. Change email settings:
Download Fewer Emails
You can limit the number of emails that your iPhone downloads for each email account you have configured. Needless to say, the fewer emails downloaded, the less disk space they’ll take up.
- To set this limit low, tap “Settings” from the home screen.
- Tap Mail, Contacts, Calendars.
- In the Mail part of the page that shows up, choose "Show". In the “Show” line, you can set the phone to show only your most recent 50, 75, 100, or 200 messages. The lower the number you use, the less disk space the emails will take up.
Mine was already set to the lowest, so that is not somewhere I can get space on my phone.
Delete Emails Sooner
When you delete an email on the iPhone, the disk space isn’t immediately freed up. Instead, that happens when the iPhone periodically clears deleted content from its memory.
You can free up disk space by making sure that those messages are actually cleared after being deleted.
Once you get it set up here is how your iPhone works:
1. When you click on the Mail program and then get to the INBOX the mail that you have received is downloaded from an email server somewhere to your phone. In SETTINGS>MAIL, CONTACTS, CALENDARS choose your email address. If you then go to ADVANCED you can set up your phone to download 50, 100, 150, 200 messages. I recommend that you download 50. That will give you the 50 newest messages and not take up as much space.
I have a lot of folders for my mail and so if I do not open them the messages that are in those folders on my computer are not downloaded onto my phone and so they do not take up space. If I download them by opening the folder and then want to remove them I have to delete them.
2. You can also set up where your messages go after they are deleted. This is also in SETTINGS>MAIL, CONTACTS, CALENDARS>EMAIL ADDRESS 2X>ADVANCED. I changed mine to go to the Trash. Now when I go to the TRASH folder it shows me all of the mail that I have deleted and I can choose to delete all of them at once. Unfortunately for me, and maybe for you. I have not been doing this for a long time so I have hundreds of messages in my Inbox that I have to move to the trash one by one before I can actually clear them from the phone.
4. Delete Voicemails
iPhone voicemails aren’t fully deleted until they’re cleared. Sure, you can mark the voicemails as deleted, but they’re still on the phone — taking up disk space — until you clear them.
I usually don't delete my voicemails just because I might want to look at them again sometime. I know how silly that is. Actually there are two steps to deleting the voicemails from the phone. If you don't do the second one, clear the deleted messages, you will still have them on your phone and you can restore them if you want to. Here are steps to fully delete your voicemail.
- Tap the Phone icon.
- Tap the Voicemail icon in the bottom right.
- If you have deleted messages that haven’t been cleared, the Visual Voicemail list will include an item at the VERY bottom of all of the messages called “Deleted Messages.” Tap it.
- In that screen, tap the “Clear All” button to permanently delete the messages and free up that valuable disk space.
When I did this my usage changed to 2.6G available and 10.9 G used. I guess that .1 G is not worth enough to open up more useable space.
5. Delete Apps that you do not use
iTunes keeps track of all of the apps that you have purchased (including the free ones). Even if you delete them from your iPhone you can download them for free again later. The list you first saw when you checked your usage told you what size different apps are. I found out that I have Pages on my phone. It takes up 289 MB (that is a lot!) I do not use my iPhone for writing, so I will take it off. There are other apps that I have downloaded to try (especially for free!), but don't use, so I can delete them.
I could delete apps right from the Usage screen. If you click on an app it takes you to a screen with a DELETE button at the bottom. Click DELETE and it is removed from the list.
This made the most difference for me so far. I now have 4.2 G Available and 9.4 G used.
6. Delete past Chat discussions
Maybe that is not such a necessary tip. It did not change my numbers at all. Maybe it was less than a MB, so it did not show up at all. I am not a big texter, so that may be the reason.
7. Remove watched Videos
In order to delete a video that is on your iPhone you first get to the list of videos and then touch the one you want to delete and drag to the left. The red Delete button appears and when you click on it the video is deleted.
This is a video that shows how that works.
8. Prefer Standard Definition Videos
In the explanation above about changing the format of movies I also checked that I Prefer Standard Definition Videos. When there is a choice between Standard and HD it will choose the Standard. This should not affect the way it looks on the iPhone since the screen is so small.
A BIT OFF THE TOPIC, BUT HELPFUL
In writing all of this up I came across a software called Tune Up My Mac that goes through your Mac to see what it has on it that is extra and may be causing it to run slowly. My computer has been running slowly, so I thought I would give it a try. For free you get a scan where it finds those extra files and then in order to remove them you have to purchase the software at $39 for a one year license. I decided to purchase it because I wanted to see how it would work.
Here is a link to it incase you are interested.
Tune up my Mac
P.S. After writing most of this and giving you my final total I found more mail that I could delete and learned about the PhotoStream. My final usage is 5 GB available and 8.6 GB used! I still have mail to delete and remove. It has been great figuring this all out. I hope it is helpful to you.