This next week I will be working with some people who are really new to using technology and want to learn how to do email. I prepared a handout for them and so I thought I would share it here also.
EMAIL BASICS
STEP-BY-STEP
GUIDE TO EMAILING
We are going to
use GMAIL as an example since most email works about the same way. There will
be some differences in the way your email looks and works if you use something
else.
GETTING STARTED
2. If you have a Google account you can
just log in. If you do not have an account you have to choose to create one by
clicking on the red button at the top right. Creating one is free.
3. Fill in the form that comes up.
You will often see something like this strange word when you are creating an account for something online. If you can type in the letters it means that you are a human with eyes and a brain and not just a computer. If you cannot read the letters you can try your best and it will give you a second chance with a different word OR click on the handicapped sign and hear the letters.
All of this ONLY HAS TO BE DONE ONCE!! Now you have an email account. You
should write down your email address and password and keep it somewhere that
you will remember.
 SENDING A MESSAGE
1. Click on the button on the left side
that says COMPOSE MAIL.
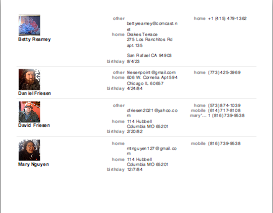
2. Type the email address of the person you
want to write to in the space that says TO. Gmail can also keep all of your
contacts, so if you have entered some into it you can click on TO and a list
will appear. You can just click on the person you want to write to.
3. Give your message a subject-this is
usually a few words describing the content.
4. In the big box type your message.
5. Press SEND. If you do not want to send
it you can choose SAVE or DISCARD.
6. Unfinished email is always kept in the
folder called DRAFTS, so if you started one and were not able to finish look
there.
All of your sent mail is saved in the SENT MAIL box. This is great
if you are not sure if you emailed someone or not or if they want you to send
something again that they lost.
READING EMAIL
When you open
your email program the first thing you should see is your INBOX. This is the
place where all new email goes. Your INBOX shows you who it is from, the
subject line in the message and the date that it came in.
New messages
are in BOLD. To read
you just click on the message and it opens up. After reading a message you can
·
ARCHIVE it-save it, but out of the INBOX. To see it I must
go to ALL MAIL.
·
Put it in
the SPAM folder by clicking the word SPAM - spam is mail that you do not want
to get. The program learns what you put into your SPAM folder and blocks future
emails for you.
·
DELETE
it-If you are done with this message forever you can delete it. The message is
findable for a month or so and then is deleted completely from the server.
·
REPLY-When a message there is a REPLY button on the top
right side. Click on this and a new message screen pops up with the message you
are answering quoted at the bottom. You can just reply the same way that you
send mail.
ATTACHMENTS
Sometimes email
that you receive has one attachment or more. An attachment is a separate file
that someone has sent you. It is usually a photograph or a document they want
to share with you.
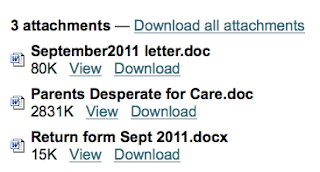 Attachments you
receive will show up on the bottom of the message. You can click to View them
or you can Download them or save them.
Attachments you
receive will show up on the bottom of the message. You can click to View them
or you can Download them or save them.
You will know
that you have an attachment because it will have a paperclip next to the
message when it is in your inbox.
If you have
something that you want to attach to an email you are writing here are the
steps:
1. Write the email.
 2. Click on Attach a File, which is just
below the area where you wrote the Subject of the message.
2. Click on Attach a File, which is just
below the area where you wrote the Subject of the message.
3. This will open a window that will allow you to find the
file you want to send on your computer. In this example I have saved something
to my desktop so that it is easy to find.
IMPORTANT TIPS
- If you type your email in all CAPS it means you are yelling!
- Since you do not have facial features or gestures to see email can often be misunderstood. Reread what you write and make sure it is clear.
- Only forward email to people that you know might be interested in the content. Too many people forward "cute" things to everyone in their mailbox.
- There are many places on the Internet where you can get keyboard codes that mean that you are smiling :-) sticking out your tongue :-P and many other things.
All email works
about the same way. Here is a simplification:
1. You send email to a friend.
2. The email you sent goes to another
computer, a server.
3. Your message is relayed to your friend.
Now when they open their email program your message will be there.
Replying works
the same way
4. Your friend reads your message and types
a reply. It goes to the cloud
5. The cloud (server) sends it on to you.
There are two
ways that people do email: OFFLINE OR ONLINE
OFFLINE: you are using a program in your computer. When you turn on
your computer and go to that program all of the messages that have come in
since you last checked are automatically put in your list right from the cloud.
ONLINE: If you do your email online you are actually connecting to
the cloud directly. If you use Yahoo, GMAIL or Hotmail this is what is
happening.
The main
advantage of doing your email OFFLINE is that even though you have to be online
in order to download your mail you can read and write even when the Internet is
not working. As soon as your computer connects to the Internet again your email
will be sent. If you do your email only ONLINE there is no way to access it or
to write email if the Internet is down.


