Wednesday, July 24, 2013
Thursday, July 11, 2013
My auto fill is WRONG! Why did that happen and how can I fix it?
 Sometimes it feels like your computer is smarter than you are, but don't be fooled. Your computer wouldn't know how to do ANYTHING if it weren't for a collection of people working together with lots of different ideas of how to make it better. Even these people are not smarter than you. They just know different things.
One of the improvements is Auto Fill. When it is working right it can save you time. However, sometimes it has the wrong information. How can you fix that? Autofill is an answer to the problem of having to fill in more and more forms that ask you to fill in the same information. Autofill is controlled by your Browser (Internet Explorer, Firefox, Chrome or Safari are the most common). It memorizes the information that you input or in some cases uses your address book and when your name comes up the program comes up with an option to Auto Fill in your information. You just have to click once and all of the information is entered instead of typing every piece of your address every time.
What if your information changes or it is incorrect? Or what if you don't want the computer to do this?
All of this information is stored in your history on the browser. The following goes step by step with how to make changes in each browser. There may be some differences in your browser depending on if you are using Mac or PC or what version of the Browser you are using. Hopefully the information below will give you enough guidance so that you can figure out your situation on your own.
Safari
1. Click on the word SAFARI on the top of the page.
 2. Find and click on Preferences.
3. At the top of the window find Autofill and click on it.
4. Put in or remove checkmarks next to the items you want to be Autofilled.

 5. If you want to change anything you can click EDIT and it will open up your address book to change the information.
Firefox
Firefox works a bit differently than other browsers. It has an Add On that does Autofill. If you want autofill you have to download the Add On. There are several different versions of the add on that you can download. These directions are for the first one: 1. After opening up Firefox go to the Tools Menu and click on Add Ons.
 4. You have to Quit Firefox and then Open it again in order for the Add On to work.
5. A new icon will appear at the top right side of the window. It looks like a pencil.

6. When you pull down the triangle to the side of it you can choose Settings and put in your information. This can be set up to hold several different profiles, so if there are different people that use the computer their information can be entered as a separate profile.
7. Now when you come to a form you can fill it in with just one click.
Chrome
 1. Click on the word CHROME on the top of the page.
2. Find and click on Preferences.

4. In the advanced options find the section about Autofill. If you don't want the program to do an autofill for you take the checkmark out of the box. If you do want the autofill option choose "manage autofill settings"
 5. A window will open and you can change what is there. You can delete addresses or add addresses. At the bottom of this window is a link that says "about autofill". It explains more about how it gets your address in the first place.
Internet Explorer
There is only a PC version of IE for the newest Mac Operating System, so these are not the best instructions. If this is the browser you use you may want to go to the link below or search online for "auto correct Internet Explorer" (if you know it you will get better results if you put in the version of Internet Explorer that you use.To change Auto Correct:
- First open up Internet Explorer.
- Find INTERNET OPTIONS. This is usually under the Settings, but sometimes it is under a menu called TOOLS.
- In Windows 8 first open Internet Explorer. Go to the top right hand corner to open the main menu. Choose Settings. Settings changes depending on what program you have open when you choose settings.
- At the top you will see the settings for Internet Explorer.
- Choose INTERNET OPTIONS and then choose CLEAR HISTORY.
Instructions with screenshots can be found here:
Monday, July 8, 2013
When I try to open a document it keeps opening in the WRONG Program
If you open your documents (word processing, spreadsheet, pictures, quicken, etc...) from the document icon on your computer usually it opens in the program that you created it in. If it opens the wrong program, what do you do?

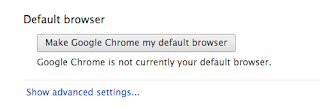 This applies to both Macs and PCs. The default browser settings are actually in the browser. They all have settings that say something like "Make this browser my default". If you click this your links will always open in that browser. You can change it by going to the browser that you want to use and finding the "Make this browser my default" choice and clicking it. It will automatically change the settings so that the other browsers do not automatically open.

 In the PC look for Internet Options under either TOOLS or Settings (the little thing that looks like a gear). Choose the Programs TAB and then look for the words CHOOSE HOW YOU OPEN LINKS. Pull down to change the browser that you want to use.
This is the way that computers work:
1. Each file is automatically associated with a program. When you click on it that program opens up.
2. Now and then, for various reasons (which really don't matter) your file opens up in a different program. Some examples of this are when you happen to have (like me) more than one word processor on your computer. You have created something in Word, but when you click on that document it opens up in Pages (or Open Office, Word Perfect), which you never use OR more commonly you click on a link from a website that you are looking at in Internet Explorer and it opens up a different browser (Safari, Firefox, Chrome, etc...).
3. This means that the file or maybe all files of that type now think that they are associated with the new program.
If you know the steps it is pretty easy to switch them back the way you want them to be. The instructions below are for MAC and following that are PC.
CHANGING A FILE ASSOCIATION IN A MAC

1. Find the file that you want to change. Hold Control down and click on the icon or name if it is listed in a list of text.
2. A window will open with several choices. Look for the words GET INFO.
3. When you click on GET INFO a new window opens giving you lots of information about that file and ways that you can
 work with it. Look down the list until you see a small box on the bottom that says OPEN WITH. It has a pull down window. It will show you all of the programs that can open this type of file.

4. Choose the one you want. If you want ALL of the documents of this type to open in the program you chose CHANGE ALL. If you do not choose this it will just make the change on the one file.
CHANGING A FILE ASSOCIATION IN A PC
1. Open DOCUMENTS to see your files OR find the document that you need to change in the way you are used to.
2. Right Click on the document name or icon. A window will come up. Look for the words OPEN WITH.
3. A window will come up with the program that this file is associated with and a checkmark in the box next to USE THIS APP FOR ALL .DOCX FILES
4. At the bottom it says MORE OPTIONS. If you click this it will open a list of other programs that can open this document. If you want to change which program it opens with LEFT CLICK on that one.
5. If you want ALL documents like that to open with the new program make sure there is a checkmark in the top box that says USE THIS APP FOR ALL DOCX FILES.
CHANGING WHAT OPENS WHEN YOU CLICK A LINK IN YOUR BROWSER
 This applies to both Macs and PCs. The default browser settings are actually in the browser. They all have settings that say something like "Make this browser my default". If you click this your links will always open in that browser. You can change it by going to the browser that you want to use and finding the "Make this browser my default" choice and clicking it. It will automatically change the settings so that the other browsers do not automatically open.
In the Mac Open up the Main Menu and choose Preferences. Click on the tab at the top that says General.
 In the PC look for Internet Options under either TOOLS or Settings (the little thing that looks like a gear). Choose the Programs TAB and then look for the words CHOOSE HOW YOU OPEN LINKS. Pull down to change the browser that you want to use.
Monday, July 1, 2013
Memory Allocation on iPhone
I received this question from a faithful reader:
I use an iPhone 4S for my company phone. I get tons of voicemails everyday and soon it will say I've used all of my memory. So now, everyday, I delete all of my voicemails and clear them from the "deleted messages." So my question is, does the iPhone have only a set amount of memory to hold voicemails? Or is it shared through everything? I only have 300 pictures on this phone so I'm confused as to why 20 voicemails take all of my memory.
I did not know the answer to this one, so I was very happy to do some research and see what I could find. After reading through lots of different discussions it was still unclear to me why you might be having this problem. I did learn a few things:

1. It doesn't seem that the iPhone has an allocation system like you may be used to on your computer. There is basically one pot of memory for all of the things that are on your phone. What your phone does have is a way of showing you what is taking up the memory. This is not an allocation, but just a reflection of what is there. To see it plug your phone into your computer and go to iTunes. Click on your phone which should be listed on the left side of the screen.
2. As was stated in my earlier blog post there are ways to delete and clear out most of the items that take up memory on your phone. See this post http://helpimnotageek.blogspot.com/2013/01/getting-more-memory-on-your-iphone.html for more information.
3. Pictures can take up different amounts of memory depending on what resolution they are saved at. If you go to Settings - Photos and Camera at the bottom of the screen you will see that there is an on off switch for "Keep Normal Photo" The pictures on the phone are HDR (High Dynamic Range) and so you have a choice to save the normal image as well as the HDR image. Depending on which iPhone you have the pictures can take up different amounts of memory. The newer the phone, the larger the picture files.
4. The one thing that you have no control over is "Other". This mysterious category includes things like the operating system itself and other secret items that make it work. If the Other category gets higher than 1 Gig it may mean that you have some corruption in your OS. The articles that I read recommended that you do a hard reset on your phone which will start the phone out fresh and should correct the problem. If you do this make sure that you have downloaded all of your pictures and music to iTunes and iPhoto or whatever photo program you use. That way you can put them back on your phone if you want them to be there. Here are the steps
I use an iPhone 4S for my company phone. I get tons of voicemails everyday and soon it will say I've used all of my memory. So now, everyday, I delete all of my voicemails and clear them from the "deleted messages." So my question is, does the iPhone have only a set amount of memory to hold voicemails? Or is it shared through everything? I only have 300 pictures on this phone so I'm confused as to why 20 voicemails take all of my memory.
I did not know the answer to this one, so I was very happy to do some research and see what I could find. After reading through lots of different discussions it was still unclear to me why you might be having this problem. I did learn a few things:
1. It doesn't seem that the iPhone has an allocation system like you may be used to on your computer. There is basically one pot of memory for all of the things that are on your phone. What your phone does have is a way of showing you what is taking up the memory. This is not an allocation, but just a reflection of what is there. To see it plug your phone into your computer and go to iTunes. Click on your phone which should be listed on the left side of the screen.
2. As was stated in my earlier blog post there are ways to delete and clear out most of the items that take up memory on your phone. See this post http://helpimnotageek.blogspot.com/2013/01/getting-more-memory-on-your-iphone.html for more information.
3. Pictures can take up different amounts of memory depending on what resolution they are saved at. If you go to Settings - Photos and Camera at the bottom of the screen you will see that there is an on off switch for "Keep Normal Photo" The pictures on the phone are HDR (High Dynamic Range) and so you have a choice to save the normal image as well as the HDR image. Depending on which iPhone you have the pictures can take up different amounts of memory. The newer the phone, the larger the picture files.
4. The one thing that you have no control over is "Other". This mysterious category includes things like the operating system itself and other secret items that make it work. If the Other category gets higher than 1 Gig it may mean that you have some corruption in your OS. The articles that I read recommended that you do a hard reset on your phone which will start the phone out fresh and should correct the problem. If you do this make sure that you have downloaded all of your pictures and music to iTunes and iPhoto or whatever photo program you use. That way you can put them back on your phone if you want them to be there. Here are the steps
- Back up all of the items on your iPhone or iPad to iTunes or iPhoto. All of your apps and purchases are already kept in a record in iTunes so you can download them again easily.
- Hold down the On/Off Button (on the top of the iPhone) and the Home Button (on the front bottom of the iPhone with the square on it) for a long time until the phone completely goes blank.
- Wait for a minute or so and then hold the on off button for a long time. Your phone should start up. It may be back to the way it was in the very beginning in which case you will have to download the items you still want on your phone.
- Check your memory categories by following the directions above to see if it has resolved the problems with the amount of space Other was taking.
Subscribe to:
Posts (Atom)