LET'S MEET ONLINE

LET'S MEET ONLINE! Call (512)560-2609 or email helpimnotageek@gmail.com and set up a time for a session. It works really well. We talk on the phone while I see your screen.
Showing posts with label pictures. Show all posts

Friday, August 29, 2014

My Phone is full of Pictures, Now What?

Recently several of my clients have had the same problem. All of them had iPhones, loved taking pictures and video and had gotten to the point where they could not update the operating system or add apps because they kept getting the message from their phone that there was not enough memory. They did not want to delete any of their pictures. 


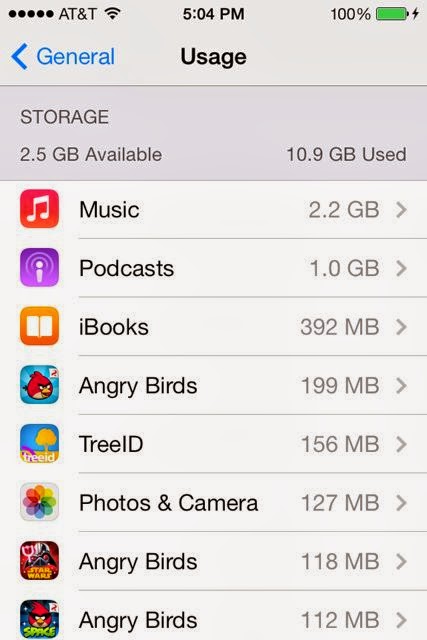
You can check the memory of your phone this way: 


  1. From the start page choose settings
  2. Open General
  3. Slide down until you see Usage and click on it.
  4. Your phone will tell you how many GB are available and how many you have used. Then it lists the apps on your phone in order of how much space they are taking. From here you can see what is taking the most space on your phone and decide what you might want to remove.
If you are sure that it is pictures and videos that are taking up too much space you may want to find another space to save them. On your computer you probably have a built in software for storing and editing your photos. iPhoto is the main one for Mac, but there is also Picasa. PCs come with Windows Photo Gallery. Each of these programs allows you to organize your pictures in different ways so that they are easy to find. 
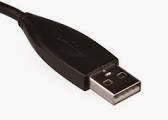
First you will need a USB connector that goes from your phone (or camera) to the computer. Once you have plugged in your iPhone (or other SMART phone) to your computer and turned it on your compute should notice it and a screen should pop up asking what you want to do with the files that are on the device you just plugged in. You want to MOVE them to your computer from the iPhone. When you have chosen to do this a window will pop up and there will be a place to check that you want them to be deleted from your phone when they are transferred to the computer. Your computer should show you the process of transferring the pictures and then the process of deleting them from your iPhone. 

Now your iPhone has new space and your photos are all in a place where you can edit them and sort them in different ways easily. 

Having a program that will store your photos online as well as on your computer is really helpful. If something happens to your computer you will not lose all of your photos. iPhoto, Picasa and Windows Photo Gallery all have ways that you can sign up to have your photos stored online. They usually give you a bit of space free (3-5 GB) and then charge you for space beyond that. 

DELETE ON YOUR PHONE

On your phone you can delete photos and video without downloading them. You can also delete them if you have already downloaded them to your computer and didn't want to erase all of them from your phone. 
Start by going to the Photos button on your phone. When you click on it your collection of photos shows up. You can see them in many different ways. For this you want to choose "photos". 


In this view they are organized by date. The first view is to see them by year. 


If you choose one of the years it will open to something called Collections. These are organized by date or place. 


If you click on one of those they are now organized as Moments. When the are in this arrangement you can see the word SELECT on the top right corner. 


If you click it the word SELECT appears at the top right of each of the groups of pictures. You will also see that there is a trashcan at the bottom right of the screen. You can select whole groups of photos or only the ones you want to delete. When you have selected more than one you will see the trashcan become blue. Now when you click it the pictures are gone.


Monday, July 8, 2013

When I try to open a document it keeps opening in the WRONG Program

If you open your documents (word processing, spreadsheet, pictures, quicken, etc...) from the document icon on your computer usually it opens in the program that you created it in. If it opens the wrong program, what do you do?

This is the way that computers work: 
1.  Each file is automatically associated with a program. When you click on it that program opens up. 

2. Now and then, for various reasons (which really don't matter) your file opens up in a different program. Some examples of this are when you happen to have (like me) more than one word processor on your computer. You have created something in Word, but when you click on that document it opens up in Pages (or Open Office, Word Perfect), which you never use OR more commonly you click on a link from a website that you are looking at in Internet Explorer and it opens up a different browser (Safari, Firefox, Chrome, etc...).

3. This means that the file or maybe all files of that type now think that they are associated with the new program. 

If you know the steps it is pretty easy to switch them back the way you want them to be. The instructions below are for MAC and following that are PC.

CHANGING A FILE ASSOCIATION IN A MAC

1. Find the file that you want to change. Hold Control down and click on the icon or name if it is listed in a list of text.

2. A window will open with several choices. Look for the words GET INFO. 

3.  When you click on GET INFO a new window opens giving you lots of information about that file and ways that you can
work with it. Look down the list until you see a small box on the bottom that says OPEN WITH. It has a pull down window. It will show you all of the programs that can open this type of file. 

4. Choose the one you want. If you want ALL of the documents of this type to open in the program you chose CHANGE ALL. If you do not choose this it will just make the change on the one file. 

CHANGING A FILE ASSOCIATION IN A PC

1. Open DOCUMENTS to see your files OR find the document that you need to change in the way you are used to.  

2.  Right Click on the document name or icon. A window will come up. Look for the words OPEN WITH. 

3. A window will come up with the program that this file is associated with and a checkmark in the box next to USE THIS APP FOR ALL .DOCX FILES

4. At the bottom it says MORE OPTIONS. If you click this it will open a list of other programs that can open this document. If you want to change which program it opens with LEFT CLICK on that one. 

5. If you want ALL documents like that to open with the new program make sure there is a checkmark in the top box that says USE THIS APP FOR ALL DOCX FILES.

CHANGING WHAT OPENS WHEN YOU CLICK A LINK IN YOUR BROWSER


This applies to both Macs and PCs. The default browser settings are actually in the browser. They all have settings that say something like "Make this browser my default".  If you click this your links will always open in that browser. You can change it by going to the browser that you want to use and finding the "Make this browser my default" choice and clicking it. It will automatically change the settings so that the other browsers do not automatically open.

In the Mac Open up the Main Menu and choose Preferences. Click on the tab at the top that says General.  

In the PC look for Internet Options under either TOOLS or Settings (the little thing that looks like a gear). Choose the Programs TAB and then look for the words CHOOSE HOW YOU OPEN LINKS. Pull down to change the browser that you want to use.


Tuesday, March 12, 2013

Solving Problems and iPhoto Faces

Sometimes this blog is personal. That is, I write about a problem that I have been having and how I resolved it (or didn't). This is one of those posts,


The other day I was meeting with a Mac Club and one of the members wanted to organize her pictures. I told her that since she had a Mac she might find that iPhoto was the best way to do it. We went into iPhoto and started looking around. I showed her how my pictures were organized into events and how to tag pictures and give them titles. Then someone else said that you should use FACES as a way to organize your pictures. Well, I have never used Faces. It seemed like it would just take too long and not be all that helpful. I am still not sure what I think about it, but I found out that my copy of FACES was not working like it was supposed to.


When you open iPhoto and click on Faces you get the message saying that to get started open a photo, then click Name and then type the name of the person in the photo. Well, after I had found Name icon (in the bottom left side) I typed in the name and the corkboard did not change. It should have put that person's picture on the corkboard and found all of the pictures that matched that person. My corkboard still had the picture above on it.

I tried this several times with no results.  So I decided to do what I usually do to try to figure something out. I Googled it. I used the words "iPhoto faces no change in corkboard".  There were lots of results, so I knew that this was a problem for more people than just me. Some of the results said iPhoto 11, so I had to confirm my version of iPhoto first. When I clicked on the iPhoto menu and then clicked "About iPhoto" I found out that I had version 9.0. Since there were still problems with iPhoto 11 I knew that upgrading would not solve my problem.

In one of the discussions that I scanned through there was a comment from someone 

1. "While holding down the Control key (bottom left on keyboard-says "control"
2.  we clicked the iPhoto library that was in my pictures folder 

3. and selected the "Show Package Contents" menu option. 


Then we threw out (click on the file name and drag it to the trash-usually at the bottom right of the dock) the face_blob.db and face.db and restarted the computer - 


(my note) The files are automatically recreated when you restart your computer, so don't worry about losing them.

Now iPhoto works fine - the Faces thing ran showing some sort spinning clock icon as it found all the potential faces in all my photos - "


I tried this and it solved my problem! It took a long time to scan through all of my photos. Now when I click on NAME and Name someone it goes through all of the my photos and tries to find matches. I have to confirm or deny that they are the person that I typed and then their face shows up on the corkboard! 


Friday, August 17, 2012

Searching With Images

I just learned something new and really interesting. You can search Google using images instead of words! 

You just go to Google.com and choose IMAGES from the top of the screen. The Google Images search shows up (like the one above). 

Click on the little camera in the window where you would usually type in a search term. 

Then find the image you want to use and drag and drop it into the spot that Google opens up for you.


The results are interesting. I found that Google matches the color of the image and finds other images that have a similar color palate.

Here is the image I used.


And here is the result:


Try it out! It is fun!

Thursday, September 8, 2011

Saving your Photos from Fire Two-Picasa

Picture downloaded from Picasa from Jeremy King
Yesterday we talked about Flickr as one place that you can upload your pictures. Having all your precious photos online somewhere means that they will not be damaged if there is an earthquake, flood or a fire. Today I will talk a little about Picasa.

Picasa works a little differently than Flickr. It actually has two parts. One is a program on your computer and the other is online file space.

You start with Picasa by going to http://picasa.google.com and downloading a copy of the free program. It puts a program on your computer that can automatically look for all of the pictures on your computer and display them into the one program. It does not actually move any of the pictures, but puts a pointer to them so that you can find them all in one place. So far all you have is a program that helps you organize what is already on your computer.

The thing I find most irritating thing about Picasa is that it automatically goes and finds all of your pictures, so when you open it up you see a scrolling window on the bottom left side that automatically finds and categorizes all of the graphics on your computer. You can set it up to only look in certain folders for pictures.

First go to Tools>Folder Manager
In the Folder Manager you can indicate which folders you want Picasa to look for new pictures. Now when you open the program it will only collect and display the new photos you wanted it to find.

Picasa always leaves the original of your photos the same as it was. It is a program for organizing and editing your photos. When you open a picture and do some editing of it the original is not changed and when you save it a second copy is saved so that the original stays the same.

The next thing that you can do with Picasa is to upload your pictures to a web album. This web album works like Flickr. You can choose to upload the pictures you want there and you can make them public or private. The photos that you have not uploaded yourself are NOT on the web and will be destroyed or lost if your computer is damaged.

In order to upload any pictures that you want to save find the picture or folder from the left side menu and at the top of the window that appears choose SHARE. You will be given a choice to share these pictures publicly or privately.


When you have uploaded them you will find them at http://picasaweb.google.com. From here you can either search everyone's public photos with the search at the top of the page or log into your own album. Your online web album also has privacy settings. Here you can allow people to see your images, but not download them or even keep them completely private so that only you can see them when you log in.

Picasa recommends that you make a back up copy of all of your pictures using TOOLS>BACK UP PICTURES in order to be sure that you are actually saving all of the originals. The program automatically resizes the photos when you upload them so that they do not take up too much space. You can set it up so that your original sizes are uploaded, but it will take a lot of room and you may use up space quickly. If you lose your external hard drive in a fire you will be happy to at least have the smaller versions saved.

Because Picasa is a Google program it has a connection to Blogger and so any images that are posted to a blog are also posted in Picasa online. All of the images from this blog can be found in the Picasa album from this blog.

There is some fantastic information here that goes more in depth. https://sites.google.com/site/picasaresources/faq

There is so much more that you can do with either Picasa or Flickr, but this should give you a start saving your precious photos. Picasa is made for editing, organizing, sharing and creating things with your photos.


Tuesday, August 30, 2011

Embed Code

On Flickr, YouTube and many other sites you get the choice to use "embed code" in order to put any media (picture, video or audio) on Facebook or another website. Here are the steps for using the embed code:
Go to the site that has the picture or video you want to use. To find the embed code choose SHARE. You will be given a choice to post to various places or get the link to copy and an embed code (on Flickr it was called HTML or BBedit code). Copy the embed code.  


    Go back to the page you want the media to be on. To go back to the place that you want the picture to show up, choose EDIT HTML or whatever you need to do in order to edit the code. You can guess where you think the picture should go by looking at the code on the page. It includes the words that are on the page, so if you do a search (CTRL-F or F3 on a Mac) for those words you can paste the code directly into the HTML. Here is an example: (I searched for the words "Here is an Example:)

    Hephaistos Temple
    When I pasted the code into the HTML on my blog this is what actually showed up!
    Now you can save, publish or preview to see that the picture or video that you wanted to show is now on your webpage.

    The reason to use embed code is that the picture STAYS on the site where it was originally and you just put in a pointer to that place. When someone looks at your page the computer automatically gets the picture or video from the other place and puts it on your page.

    Tomorrow we are back to Facebook!

    Wednesday, July 20, 2011

    Working with Images Online

    When I added this (741 KB) picture Blogger automatically resized it so that it would fit the screen.

    This is the same image that I resized myself to 8 KB
    For the longest time I was so frustrated when I saw a picture online that I liked and then printed it and the picture printed out tiny OR someone sent me a picture and it would not fit on my screen because it was so huge.
    This is because the pictures that you see on the screen are digital representations of the pictures that people have put onto their webpages or emailed to you. Pictures are measured in DPI or dots per inch. In order to make digital pictures small so that they download quickly people often compress their photos. The computer takes out some of the dots in a way that the picture still looks good on screen! This can effect the resolution of the picture (or the quality) so that you cannot drag the picture to a larger size. When you try it becomes little color squares..

    Most (all?) digital screens only show up to 72 DPI (or dots per inch). If the picture you are seeing has high resolution (more than 72 DPI) sometimes the picture will look HUGE on your screen. One confusing thing is that many programs (like word) allow you to click on the image and drag the corner to make it smaller.  When you do this you are only changing the LOOK of the picture, not the DPI, so even though it looks small it will take a LONG time to download and when someone tries to print the picture it will come out huge.

    You cannot make a picture with a low number of dots per inch bigger. It will not look good. Artists (and lots of other people) save both a high quality, high resolution picture and the smaller one that they can use to send to people or post online. 

    I hope that this is a helpful explanation of images online. If you have questions please post them in the comments. Tomorrow's post will be about FILE SIZES.