LET'S MEET ONLINE

LET'S MEET ONLINE! Call (512)560-2609 or email helpimnotageek@gmail.com and set up a time for a session. It works really well. We talk on the phone while I see your screen.
Showing posts with label Mac. Show all posts

Thursday, December 6, 2018

Is your Mac Running Slowly?

IS YOUR MAC RUNNING SLOWLY?

Maybe it needs a clean up of large files.  If you have the Operating System called Sierra there are several features to do that for you!
  1. To find out what operating system your computer has click on the black apple in the top left corner and choose About this Mac. The window will tell you what operating system you are using.Mac storage
  2. Now click the storage tab. Wait a second and this will tell you how much storage you are using. 
  3. Now choose Manage.  This will show you things you can set up that will maximize your storage space.
manage storage
  1. Store in iCloud -  This will save some space on your computer, but you may have to pay for extra space on iCloud.  5G comes free with you iCloud account and it is about $1 a month for more 50G more.
  2. Optimize - This dumps iTunes videos you have already watched and deals with email attachments differently.
  3. Empty trash automatically - permanently deletes anything in the trash more than 30 days.
  4. To me the most interesting was Reduce Clutter -  It goes through your machine and gives you a list to review all of the large files on your computer. You can the keep, delete, or transfer them to a CD or Thumbdrive. I think I could spend hours on this, but I won't because I am not short on space!
list of files
If you have an older mac there are programs that you can download that will do similar things. Some names are: CleanMyMac 3Gemini 2Disk Cleanup Pro and Dr. Cleaner . It is a good idea to type the name of the program with the word review in you browser and read the reviews before you download. Always back up your Mac before using software intended to automatically delete files on your computer — just in case.

Friday, February 26, 2016

What is Home Share on the Mac, iPad, iPhone and Apple TV?

A client recently wanted to sync her music from her Mac to her iPhone. Since I am not a Geek and don't keep up with my iTunes Music much I assumed that it was automatically syncing just like my contacts, calendar, mail and photos.

I was wrong. (shocking I know!) My explanation for what things sync and what is treated a different way is ownership. I own my contacts, calendar, mail and photos. I do not own the music in my iTunes. In many cases I purchased the CD's that I copied onto my computer or paid for downloaded albums. Someone else owns the copyright, so Apple handles it differently. You are allowed to have 5 authorized computers. This allows you to put the same content on 5 different devices.

First you have to set up Home Sharing on all of the devices that you want to share. This involves going to the setup and putting in your Apple ID and Password. On your Mac open iTunes and go to FILE>Home Sharing. For some reason mine was already set up and it said Turn off Home Sharing. I don't remember setting this up, but was glad that it was already on. 

On your iPhone and iPad you do this through settings. Click on the Settings Icon and then Find Music in the list of things to set up. At the bottom it says Home Sharing and again mine already had my Apple ID entered in that space. On my Apple TV I also went to the Settings Icon. Then under General and Accounts I found Home Sharing. Again it already had been set up with my Apple ID

At that point I really wondered why my music lists were not the same on the different devices.  I was just missing one step. On each of the devices except for the computer I  had to find the place that listed what I wanted to listen to. On both my iPhone and my iPad there was a pull down menu that said Artists, Albums, Songs, Genres, Composers, Compilation and what I had not seen before Home Sharing!  Once I switched to Home Sharing the devices connected to my computer and now I can play the same music on all of them. Once I had done that magically all of the music was added to my list on the Apple TV.

Buena Vista Social Club
Right now I am listening to one of my favorite albums through my Apple TV and surround sound!

Monday, February 22, 2016

Making Labels using Mac

MERGING ADDRESSES WITH ENVELOPES, LABELS OR LETTERS

This document is created with a Mac and so the screenshots in it will be from the Mac. However, the process is the same with a few changes in the names of menus for other computers.

It helps to understand the concept first. You need two documents to start. 

THE FIRST DOCUMENT

This document is a spreadsheet or a .csv file. It is the data that you want to use for your letter, envelopes or labels.

You can get this document from your contact list program on your computer. Look for the word EXPORT and choose as a .csv file. Save this file somewhere that you can find it and set it aside. 

THE SECOND DOCUMENT

This is the document that you will use to create your envelopes, labels or letter. 

    • If it is a letter you can type the letter and just leave space wherever you want something filled in by your computer. 
    • For both envelopes and labels the computer will walk you through the formatting of the labels.

PROCESS

While you have the second document open (it will be a blank document if you are making envelopes or labels) choose the TOOLS menu and look for Merge Wizard or something similar. This will walk you through these steps:

  1. Identifying the document that has the data (it will probably be a .csv file) To get this file you may need to export your address from your contact list or create a spreadsheet with the information you need and save it as .csv. The top row of your CSV file should be the names of each column (ie. first name, last name, street address)
  2. Choosing what you want to create (labels, envelopes or a letter)
  3. Placing placeholders in the right places. The placeholders are the names of each of the columns in your spreadsheet. <first name>, <last name>, etc….  You will insert them in the places that you want them to show up. While doing this you can also add spaces, commas and format the text. If you create a label it will look like this:

<first name> <last name>
<street address>
<city>, <state> <zipcode> 


If you are using Word for Mac here are the steps with screenshots to show what you will see. First open up a blank document.

  1. Find the Mail Merge Manager by going to the TOOLS Menu at the top of the screen  


It will open up with step by step instructions on how to create a merge document. Pull down the triangle next to the words “Create New” and choose what type of document you want to create. 


If you choose Envelope this is what you will see.  To create the envelopes just click OK. If you want your Return Address to print on all of the envelopes you will need to enter it into the information about you in the Preferences under Word. The computer will use this information to fill in the Return Address information. This is where you can change the font that will be used for the addresses and your Return Address. 


When you click OK you will need to move on to step 2. Select Recipients list. Here you will click on the binoculars to find the .csv document you have saved with all of the addresses you want to use.


You can see that I am searching or a file that I know is on my desktop. It is called test.csv.  


This will move you on to Step 3 Insert Placeholders. Your computer will take from your list the information on the First Row of your .csv file. You will drag each one to the place that you want it to show on the envelope. Things like commas and spaces need to be typed in between the placeholders.


You can filter the recipients and preview the results if you want to. I like to go on to the final step and Complete the Merge. 


When you complete the merge click on the middle icon which will make the addresses print on to documents. 


That way you can see what the envelopes will look like before you actually print them. A new document will open and your envelopes will show like a list of pages. You can also choose to merge it directly to the printer. If your envelopes are ready in the printer when you choose this they will just print out!


Wednesday, October 7, 2015

PC vs. Mac

This is an old debate. I know that there are many places that you can read about it in blogs and all over the Internet. I have tried to be neutral on the PC vs. Mac debate. My main opinion is that it is what you are used to that is the best. Some people have only used PC and swear by it as the best Operating System. They are frustrated when they even try to use a Mac. It happens the other way also.

I have had to use both at different times and can see the value of either both. However this morning I am leaning toward Mac for what I do. I will tell you why.


I help people to be successful using technology. The people I work with in my business are not computer lovers. They have something that they want to do and must do it on the computer. Either they never had much experience using technology or they had extensive experience, but only in one area (maybe word processing) and need to know something else (spreadsheets?, websites?, social media?, working with photos?). They are not people who tinker with their machines and want to add more memory or a better sound card. They just want the computer to work.

It is hard to choose to buy a Mac because they are so much more expensive to start with. They are also not easy to tinker with. There are people who like to really KNOW their computer inside-out. They want to be able to change components and make a computer that works for them. PC's are better for that person. If you want to understand your computer, change it and keep it up to date a PC can be an excellent choice.

Here are my personal reasons for choosing a Mac:


from http://atom.smasher.org/error/gallery/ MAKE YOUR OWN!
My Mac just works. Almost all of the time. The few times it has problems the error messages that I do get on my Mac are for the most part pretty understandable. They are written for users. On my PC and on the PCs of people I work with the errors are cryptic for us non-geeks. It helps to have lots of experience in order to figure out what they might mean, but they are scarey. Today I got a Runtime error on my PC. Because I use computers all of the time I could figure out that it had to do with a certain program and I had to write their help people with the error message to find out what to do with it, but I know that for many people I work with it would be the end. They would turn their computer off hoping not to hurt it and say that it was broken.


Technology turn-over. It seems to me that the PC items I have purchased have a shorter life-span than the Mac products I have purchased. I have the second generation iPad. Even though Apple has come out with 2 more since I got mine and the new ones are better, mine still works well. Lots of people bought the first version of the iPad. They still work. They do not have a camera, which makes the others much better, but they do work.


I went out and got a Surface as soon as they came out. I usually wait for the second generation, but I wanted to experience Windows 8. It is mostly sitting unused on my shelf. Even Windows 8 was a passing thing.


I know that technology changes constantly, but with Macs when I have upgraded it is because I want a newer, faster model. When I have upgraded my old one still works and I am glad to pass it on to someone who can use it. This is not true of the PCs I have had. When they get old they are so slow that they are not worth using. My surface is not of much use to anyone (or maybe there is something I don't know and someone can suggest in a comment what to do).

I do have a positive PC story to end with, so that you won't think I am a Mac snob. A client of mine just came to me with a PC (HP) that she had purchased on sale. It was a GREAT buy and a fantastic computer. I am glad she found a good deal. She is used to using a PC and so the move to Mac, which she tried, was frustrating. So I never tell my clients what type of computer to purchase. 

So, you see, my feelings are mixed. I am assuming that many people who read this will have comments. It is an issue that people feel strongly about. I wrote out of some frustration with my PC experience, but I am sure that there are people who have had similar experiences with Mac. Bring it on!  I am interested to read what people have to say.

Monday, May 12, 2014

Help!! I have a bunch of files to rename!

When I connect my camera to my computer and download the pictures they are all files named DMG001, DMG002, etc... Usually I don't have time to rename each of the pictures one by one. It helps me to remember what they are if I name them something more meaningful.  So, I searched and found some software that would do that for me.

This is often called a “batch” process because you are changing a batch of files at the same time. To find some software I did a search for 'software to rename files mac' You could do the same for 'software to rename files PC' and add the word free if you want to be sure that you get a free option.

I chose NameChanger because it was free. 


MAC

    picture of NameChanger window
Open NameChanger and find the files that you want to change. Set the program up to change parts of the name or the whole name. Notice that there is a pull down menu that gives you several choices. You can choose to give them all the same name with a numeral at the end that changes (1,2,3)


  1. Find the files that you want to change. This may mean opening a folder and clicking COMMAND-A to select all of the files.
  2. Drag the files into the first column showing on the NameChanger window.
  3. Click the RENAME button on the top.


On the left side you will see the result and automatically you will also see that the file names have changed in your computer.

PC
There are free options to do the same thing on a PC. 


TO CHANGE ONE FILENAME AT A TIME

MAC
Click on the file one time to highlight it. Count to 10 and then click just the name of the file one time and wait for a second or two. You will see the name highlight in a way that allows you to type whatever name you want it to be.

PC
Right Click on a file (Remember right click always gives you another menu). In the menu that pops up you will see the word “rename”. Click on it and you will be able to give the file a new name.


Thanks to Glee for having this problem so that I could figure it out and write it up here!

Monday, September 23, 2013

iPad: Transferring Docs to Mac and Back

Occasionally I have worked with people who have Pages both on their Mac and on their iPad. It only costs $9.99 to put Pages onto your iPad. I had version 8 when I started and was not able to transfer documents. You must upgrade to version 9 in order to transfer documents. When I did that it automatically upgraded the copy of Pages on my Mac. I didn't know it would do that, but it did!

The process for adding pages from your computer to your iPad follows:


    • Go to iTunes on your computer. 
    • Plug in your iPad.
    • Select your iPad in iTunes and select the apps section at the top.
    • Slide down the page until you see Pages under File Sharing and click on it.


    • Click on Add at the bottom of the page.
    • Find the document by following the path on your computer.
    • When you click on it you will see it added to your list in the iTunes Pages list.
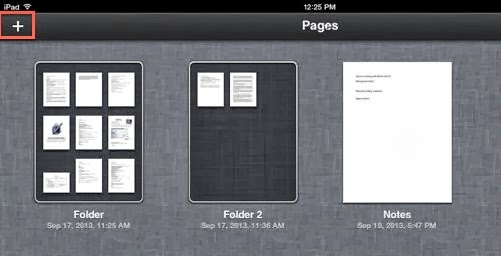
    • Now go to Pages on your iPad
    • Click on the + sign.

    • Choose “copy from iTunes”
    • When you see the document that you want to import to your iPad click on it and it will be added to your iPad. You must have iWork 09 on your computer or this will not work, even if you have iWork 09 on your iPad.

Here are the instructions about moving the files from Pages on the iPad to iTunes and finally saving them on your machine:

    • Open up Pages on your iPad Select the document you want to move and open it.
    • When the document is open click the wrench on the top right corner.
    • A window will open. Choose “Share and Print”
    • That will open a new list. Choose “Copy to iTunes”
    • Now plug your iPad into your computer and choose which format you would like to transfer (pages, doc or pdf)
    • When you choose the file will automatically be transferred to your computer.  In order to see it you have to open iTunes.
    • Click on the Apps category at the top and slide down the whole page until you see Pages. 
    • Click on Pages and a list of the documents that you have transferred will appear.
    • Choose the document that you are interested in having on your computer and click “save to” at the bottom. 
    • A window just like most save windows will open and show your folders on the computer.  Choose the one you want to save it to and click Save to.
    • Now you will be able to open it up on your computer.

This is a lot of work to go through if you have lots of documents to transfer. You may want to consider using the cloud in order to keep your file system and import all of the files at once. Here are steps to do that:

    • To Set up iCloud go to Settings on your iPad.
    • Click on iCloud on the far left list.
    • Sign in with your account.
    • Use the sliders next to each of the apps to show what you would like to sync.
    • Make sure that Documents and Data is turned on.
    • Scroll down to Apps on the left side of the settings window and tap Pages
    • Slide “use iCloud” to ON.

To put new folders on your iPad in Pages: 

First hold your finger on a document you want in a folder until it wiggles. Then drag this document on top of another one that you would like to have in a folder. A window will open up with Folder 1 as a name. You can type to replace the name with a new name.
 

I learned most of this from:


Monday, July 8, 2013

When I try to open a document it keeps opening in the WRONG Program

If you open your documents (word processing, spreadsheet, pictures, quicken, etc...) from the document icon on your computer usually it opens in the program that you created it in. If it opens the wrong program, what do you do?

This is the way that computers work: 
1.  Each file is automatically associated with a program. When you click on it that program opens up. 

2. Now and then, for various reasons (which really don't matter) your file opens up in a different program. Some examples of this are when you happen to have (like me) more than one word processor on your computer. You have created something in Word, but when you click on that document it opens up in Pages (or Open Office, Word Perfect), which you never use OR more commonly you click on a link from a website that you are looking at in Internet Explorer and it opens up a different browser (Safari, Firefox, Chrome, etc...).

3. This means that the file or maybe all files of that type now think that they are associated with the new program. 

If you know the steps it is pretty easy to switch them back the way you want them to be. The instructions below are for MAC and following that are PC.

CHANGING A FILE ASSOCIATION IN A MAC

1. Find the file that you want to change. Hold Control down and click on the icon or name if it is listed in a list of text.

2. A window will open with several choices. Look for the words GET INFO. 

3.  When you click on GET INFO a new window opens giving you lots of information about that file and ways that you can
work with it. Look down the list until you see a small box on the bottom that says OPEN WITH. It has a pull down window. It will show you all of the programs that can open this type of file. 

4. Choose the one you want. If you want ALL of the documents of this type to open in the program you chose CHANGE ALL. If you do not choose this it will just make the change on the one file. 

CHANGING A FILE ASSOCIATION IN A PC

1. Open DOCUMENTS to see your files OR find the document that you need to change in the way you are used to.  

2.  Right Click on the document name or icon. A window will come up. Look for the words OPEN WITH. 

3. A window will come up with the program that this file is associated with and a checkmark in the box next to USE THIS APP FOR ALL .DOCX FILES

4. At the bottom it says MORE OPTIONS. If you click this it will open a list of other programs that can open this document. If you want to change which program it opens with LEFT CLICK on that one. 

5. If you want ALL documents like that to open with the new program make sure there is a checkmark in the top box that says USE THIS APP FOR ALL DOCX FILES.

CHANGING WHAT OPENS WHEN YOU CLICK A LINK IN YOUR BROWSER


This applies to both Macs and PCs. The default browser settings are actually in the browser. They all have settings that say something like "Make this browser my default".  If you click this your links will always open in that browser. You can change it by going to the browser that you want to use and finding the "Make this browser my default" choice and clicking it. It will automatically change the settings so that the other browsers do not automatically open.

In the Mac Open up the Main Menu and choose Preferences. Click on the tab at the top that says General.  

In the PC look for Internet Options under either TOOLS or Settings (the little thing that looks like a gear). Choose the Programs TAB and then look for the words CHOOSE HOW YOU OPEN LINKS. Pull down to change the browser that you want to use.


Tuesday, February 26, 2013

Clean Up and Maintenance of Your Computer

This is one of those important things that no one tells you to do and you always feel uncomfortable knowing that there is probably something you should be doing. Then if your computer breaks down one day you think it must be your fault. 

Actually taking good care of your computer is not too difficult or confusing. There are things that you can do beyond what I talk about here, but they are not necessary for most home users. See links below if you want to know more.


There are things that EVERY computer owner should do regardless of if you are using Mac or PC and then a few specific things to each operating system.

  1. The MOST important thing to do for any computer is to BACK UP regularly. It can (and does) happen that your computer completely shuts down. You do not want to lose all of the files that you have on your computer, so it is important to have a second copy. You can use an external hard drive, a CD or DVD, or somewhere on the Cloud using a service like Dropbox, iCloud, SkyDrive, Google Drive or one of the many others. Here  is a link to several reviews of free back up software. http://www.techsupportalert.com/best-free-backup-program.  When you back up your files are all backed up so that you can get to them again, but not your programs. If you want to have a backup of all of your programs so that you do not have to download them individually again you can use Acronis or Norton Ghost which will "take a snapshot" of your whole hard drive. 
  2. Physical cleaning of the outside of your computer. This is important because the crumbs that get into your keyboard, the dust that gets into the fan and the general grime can cause your computer not to work as well as it can. Here are suggestions for each of the parts.
    • Screen - Use screen cleaner that does not have ammonia or alcohol. For a laptop, set the back of the screen onto a towel or something soft on a table while holding up the keyboard with one hand. Spray the cleaner onto a soft cloth and clean the screen gently with a circular motion.
    • Keyboard - Using a similarly damp cloth clean the outside of the keys. Use compressed air to clean out the crumbs and dust that collects under the keys. You can use an antibacterial wipe on the keys since lots of hands touch a keyboard.
    • Wipe outside with the damp cloth.
    • Clean up the files on your desktop by either putting them into folders that are meaningful OR moving them to other folders in your file system. Each thing on your desktop takes up some of the memory that your computer needs to run. Your computer can slow down if there are too many things just left on the desktop.

    Always do the updates that your computer recommends. Most of the time a window will pop up saying that you should update something and you can press OK or cancel. If you always cancel these things you may be stopping your computer from doing some things that can really help.


    One more good habit to get into is to empty the trash weekly or even daily depending on how much you use your computer. Everything in the trash is taking up some of your memory until you empty it out. The whole reason that the trash can exists is so that you can change your mind and drag something back out of the trash if you decide that you need it. Once you are sure that everything is not needed empty what is there so that it does not take up space.

    Use a surge protector for plugging in your computer. If the electricity is interrupted (like when you are struck with lightening) it will protect your computer from burning out.

    Completely shut down and restart your computer regularly (maybe overnight?). When your computer shuts down and restarts many things happen in the background that clean up some of that background stuff that the computer automatically does.

    PCs (by this I mean any computer that is not a Mac. It could be IBM, HP, Dell or one of many other companies. You should add these practices to the above in order to maintain your computer. 
    • Make sure you have a good Anti-Virus program and that you keep it up to date. There are lots of Anti Virus programs that you can download and you probably have one that came with your computer. There are free ones  http://www.techsupportalert.com/best-free-anti-virus-software.htm and also ones that you can pay for like Symantec, Norton or Barracuda. Do not load more than one on your computer because they can conflict with one another and will not be effective. 
      • Regularly download updates because hackers are always busy creating new ways to get into your computer. If you want to avoid getting a virus there are a few things that you can regularly do. 
      • NEVER open links from email if you don't know the person or even if you know them and they JUST sent a link with nothing else. There are hackers that send out email with a link and make it look like it is coming from someone safe. The link might open to a website with an automatically downloading virus 
      • Do NOT trust any email from a bank, PayPal, Amazon, Western Union, or any company that looks legitimate, but tells you to give them an account number, send them money or anything that sounds fishy. It probably is a scam. There are lots of these going around and it is REALLY easy to click on a link from one of these to find out more, but it is better to just delete them. If it is from a real company they will NEVER ask for personal information like account numbers in email. You can often look in the TO: section at the top to see who it was sent to. If it was sent to a bunch of people that you do not know it is spam.
    • Defragment your computer hard drive monthly. As you save, delete and move your files around they create gaps in the hard drive space which are not used because they are small bits stuck inbetween other stuff. Defragmenting pushes all of the stuff together creating more open space. This is less important than it used to be since Hard Drives are bigger than they used to be, but it might help if your computer is running slowly. The Defragmenter is on your computer. Most likely you will find it under System Tools-disk defragmenter.

    On a Mac
    1. Remember the things above that appled to both computers. Macs have TimeMachine installed which can do your back ups on a regular basis. There are some features of other programs that you can pay for which TimeMachine does not have. Macs get fewer viruses, but it can still be an issue. You can pay for a virus protection program or get one free. Here is a link to a free one: http://www.sophos.com/en-us/products/free-tools/sophos-antivirus-for-mac-home-edition.aspx
    2. If your Mac gets slow and bogged down there are a few things you can try to see if they will help. Your Mac has something called Disk Utility which is a program that you can run to see if there are any problems on your hard disk and it will fix them. You can find it by clicking on Mac HD, in the Applications File under Utilities. You can also run a program like Onyx which can clean off the HD of any issues that are slowing it down. Some articles I read called for using the Disk Utility regularly, like every three months. 
    MacWorld's Maintenance Calendar - MacWorld offers a free download of a calendar to remind yourself when to do different maintenance tasks. http://www.macworld.com/article/1133696/maintenance_cal.html

    For even more on cleaning your mac look at this MacWorld article:


    Saturday, November 5, 2011

    Changing the Language on Your Computer

    Computers allow you to change all sorts of things in order to make them easier for you to use.  Each thing that you change only changes SOME of the programs on your computer.

    This post will at least show you where to go to change the language. Knowing that it can be done is the first step.

    You may need to go into each of the programs that you want to use and change the language that it uses. The way this is done varies with each program, but there are a few things that are the same. The instructions below should get you started. As usual, if you have anything to add to what is here please put a comment so that we can all learn from each other.

    ON A MAC
    On a Mac all of the controls are in the System Preferences.

    1. The best place to find these is to click on the Apple at the top corner of the screen. On my computer it is black, but it can also be a rainbow apple. 
    2. Look for the word System Preferences in the window that comes down.
    3. When you choose System Preferences you will see that in the top row you have a choice called Languages and Text.

    1. When you open this up it will give you lots of choices for how you want your computer to communicate to you.
    2. Down below that you will see something called "Universal Access". This is where you can change the size of the font and the color of the screen. You can also make it so that your computer talks to you and change the speed of the keyboard and the mouse.
    3.  On the top row is a button called Languages and Text. Click on this to set the main language for your computer to use. 
    4. Once you have clicked on it you can drag the language you want your computer to show to the top of the list. You can also change several other things that have to do with language here, like what characters show up when you type or what format is shown for money or time.
    On this blog there is an arrow on the top right that lets me change the language that it shows up in and it changes right away.

    ON A PC


    On a PC all of the set up items are found in the Control Panel.  Click on the Start Button or picture of windows on the bottom left corner. On the right side you will see the words Control Panel.
    In this window you will be able to change the LOCATION which tells the computer that you are in a different country. Your time will change on the clock. Then you can choose the tab at the top of the page Keyboards and Languages. Here you can choose to change the default language for input. 
    When you open the Control Panel one of the choices is Clock, Language and Region. 


    Click on that choice and then choose Region and Language. 


     Once you have set your main languages there is a language bar that shows up at the top and you can switch back and forth.


     When I changed the language settings on my computer it seemed to change the languages on most of the webpages in Internet Explorer.


    It also changed the way that words showed up in the controls of my computer.