LET'S MEET ONLINE

LET'S MEET ONLINE! Call (512)560-2609 or email helpimnotageek@gmail.com and set up a time for a session. It works really well. We talk on the phone while I see your screen.
Showing posts with label how to. Show all posts

Monday, February 22, 2016

Making Labels using Mac

MERGING ADDRESSES WITH ENVELOPES, LABELS OR LETTERS

This document is created with a Mac and so the screenshots in it will be from the Mac. However, the process is the same with a few changes in the names of menus for other computers.

It helps to understand the concept first. You need two documents to start. 

THE FIRST DOCUMENT

This document is a spreadsheet or a .csv file. It is the data that you want to use for your letter, envelopes or labels.

You can get this document from your contact list program on your computer. Look for the word EXPORT and choose as a .csv file. Save this file somewhere that you can find it and set it aside. 

THE SECOND DOCUMENT

This is the document that you will use to create your envelopes, labels or letter. 

    • If it is a letter you can type the letter and just leave space wherever you want something filled in by your computer. 
    • For both envelopes and labels the computer will walk you through the formatting of the labels.

PROCESS

While you have the second document open (it will be a blank document if you are making envelopes or labels) choose the TOOLS menu and look for Merge Wizard or something similar. This will walk you through these steps:

  1. Identifying the document that has the data (it will probably be a .csv file) To get this file you may need to export your address from your contact list or create a spreadsheet with the information you need and save it as .csv. The top row of your CSV file should be the names of each column (ie. first name, last name, street address)
  2. Choosing what you want to create (labels, envelopes or a letter)
  3. Placing placeholders in the right places. The placeholders are the names of each of the columns in your spreadsheet. <first name>, <last name>, etc….  You will insert them in the places that you want them to show up. While doing this you can also add spaces, commas and format the text. If you create a label it will look like this:

<first name> <last name>
<street address>
<city>, <state> <zipcode> 


If you are using Word for Mac here are the steps with screenshots to show what you will see. First open up a blank document.

  1. Find the Mail Merge Manager by going to the TOOLS Menu at the top of the screen  


It will open up with step by step instructions on how to create a merge document. Pull down the triangle next to the words “Create New” and choose what type of document you want to create. 


If you choose Envelope this is what you will see.  To create the envelopes just click OK. If you want your Return Address to print on all of the envelopes you will need to enter it into the information about you in the Preferences under Word. The computer will use this information to fill in the Return Address information. This is where you can change the font that will be used for the addresses and your Return Address. 


When you click OK you will need to move on to step 2. Select Recipients list. Here you will click on the binoculars to find the .csv document you have saved with all of the addresses you want to use.


You can see that I am searching or a file that I know is on my desktop. It is called test.csv.  


This will move you on to Step 3 Insert Placeholders. Your computer will take from your list the information on the First Row of your .csv file. You will drag each one to the place that you want it to show on the envelope. Things like commas and spaces need to be typed in between the placeholders.


You can filter the recipients and preview the results if you want to. I like to go on to the final step and Complete the Merge. 


When you complete the merge click on the middle icon which will make the addresses print on to documents. 


That way you can see what the envelopes will look like before you actually print them. A new document will open and your envelopes will show like a list of pages. You can also choose to merge it directly to the printer. If your envelopes are ready in the printer when you choose this they will just print out!


Friday, July 4, 2014

How can I figure things out on my own?

It is likely that many of the people who read this blog already know this or already think this way, but I thought it was worth mentioning. It took me a long time to think of the Internet as the FIRST place to look when I needed something. This is one of those things that I think is a brain changing thing that technology can do. (good or bad?  I don't know)

Searching the Internet is an amazing way to find out what you need to know about ANYTHING!

I do this often. I go to Google and put in almost any words that apply to my situation. At the end of this article are links to other search engines that are very helpful. Google is not the only search engine, but it is the one that is most commonly used. The best way is to put in ALL of the words that describe it and depending on what you find take out words one by one. 

I am telling you this at the risk of losing business!  However, I am in business to help people to be successful using technology and there are always people who learn best from other people. 

One Example:

My iPad, my iPhone and my Computer are not syncing.

I first try typing in all of the main words of the sentence above and before I have even typed in all of the words the suggestion comes up:


On the first page most of the choices are from Apple Support. I know this because below the title of the page on the first line is the URL of the website.  Most of them start 'www.apple' or 'support.apple' The first page listed may answer your questions. Sometimes the text below the URL will be enough to let you know if this answers your question or not. Apple includes some screenshots and also links to other articles that might answer questions. 

All of the other Apple sites lead to other Apple help pages. They might have the answer to your problem. There is one that says Discussion in the URL. I find these particularly helpful because other people often have the same issue and in the discussion it is solved. 


Finally below the first 7 responses is one from 'lifehacker.com' and then one from YouTube. I usually go then to the YouTube answer because they are often helpful.  Here is the YouTube for this question. 


As I listened to this one I realized that it could be confusing or helpful depending on your prior knowledge and if you use a Mac or PC. 

It does take patience to look through the sites and try things and then keep searching, but you are often able to find a solution this way. It works for me!

Specialized Search Engines

http://momondo.com - Travel
http://kayak.com - Travel

http://jewogle.com - a search for holidays returns Jewish holidays only!
http://seekfind.com - a Christian search engine Returned "Should Christians celebrate holidays" and "Are Christian Holidays Pagan in origin?" among others.

http://pipl.com - people search - search yourself and see what you find... 


Tuesday, February 18, 2014

The End of Windows XP

As I write this the end of Windows XP is soon and sure. The website where I learned about it (http://go.cmitfranchise.com/dump-xp) gave this time-
Countdown to the Death of XP
52:10:40:53
Day(s)Hour(s)Minute(s)Second(s)

When you read this more time will have passed.

They give many good reasons why you should make a change in your Operating System before then:
  • When the end comes Microsoft will not be sending updates. These updates are important because they often fill security holes and not having them will make your computer vulnerable to viruses.
  • The drivers for XP will not be updated, so if you get a new printer or other device the XP will not be able to connect and work with it.
  • The will also be ending their support for Microsoft Office 2003.
  • This is also the end of Microsoft Security Essentials.
WHAT SHOULD YOU DO?

CHECK TO SEE IF YOU HAVE WINDOWS XP

Depending upon your current operating system you can check this in different ways. Right now there are mainly four versions: Windows XP, Windows 7, Windows Vista and Windows 8 or 8.1.  It is easy to know if you are using Windows 8 or 8.1 because it looks so different. Here is an example of what you will see when you turn on your computer:

If you have Windows 8 or 8.1 you do not have to do anything.

If your computer has a desktop with a picture and a START menu in the bottom left corner you have Windows 7, Windows Vista or Windows XP. To find out which one of them you have you want to check the Properties. 

One way to do that is to open the START menu and find the word 'computer'. Right click on the word computer and choose Properties.

Another way is Click the Start button Start button, click or type Run at the bottom of the menu and then, type winver into the space that opens up


Press enter and a window will open up that will tell you the version.


IF YOU DO HAVE WINDOWS XP

It is time for you to make a change.

It is possible that your computer is old and slow and it is time to upgrade by getting a new computer. This may be the easiest solution, but I know that everyone cannot afford to do that.

If that is not true of your computer or you can't afford to buy a new one you can download the new Operating System by going to:

Look for the words  
  • Here is a summary of the requirements.  This may not be meaningful to you, but the Windows Upgrade Assistant will tell you if your computer can run a new operating system.
    • Processor: 1 gigahertz (GHz) or faster
    • RAM: 1 gigabyte (GB) (32-bit) or 2 GB (64-bit)
    • Free hard drive space: 16 GB (32-bit) or 20 GB (64-bit)
    • Graphics card: Microsoft DirectX 9 graphics device with WDDM driver
  • If your computer is too old it may not be able to run a different Operating System. 
If your computer can run a new Operating System the first step is always to back up all of the files on your computer. Backing up is a whole subject to figure out. Look at the link below for more information.


In order to upgrade you will have to remove your files and programs from your computer and put them back in after you have run the CD that will install the new version of Windows. This is a complicated process and it is made more confusing if you have lots of software downloaded onto your computer. It is not hard to back up your files and settings and then reinstall them (there is a program that will do that for you), but then when you are done you will have a "clean install" withouth any software that you downloaded before. You will have to find your CDs or look online for where you downloaded them and get them again. If you have old versions you may have to pay for newer versions.

If you have very little software or just want to start out over again without all of the programs you used to have the upgrade will work easily. You can upgrade to Windows 7 or Windows 8. Windows 7 costs a little less, but since it is not the newest version it will need to be updated sooner than Windows 8. 

Here are some articles on the web about upgrading your version of XP. 

This webpage has a step by step tutorial and a video to explain what you need to do.

A helpful article on upgrading to Windows 7

Recommendation to buy a new PC rather than just upgrade.

Comparison of Windows 7 and Windows 8

You will have to purchase the new operating system on disks. It will cost from $75-$125 depending on where you buy it and whether you by Windows 7 or 8. Since 8 is new it is a bit more expensive.

Here are some places online that you can order it. You can also find it at local Computer Stores and stores like Staples or Office Depot.

eValue Software

Microsoft Store

Amazon


WANT TO BUY A NEW COMPUTER?


My main advice is to start with a few questions:
  • What are you going to use it for?
  • How much do you have to spend?
I have a 13 inch MacBook. Even though it cost more at the beginning I felt it was a good value because it had a camera and microphone built in. Also, it seems to work without having to download lots of drivers or add on other components.

How to Buy a New Computer
http://www.wikihow.com/Buy-a-New-Computer

Finding the Right One for You -http://www.techradar.com/us/news/computing/best-computer-how-to-choose-the-right-one-935053

Buying a Refurbished Computer
http://www.computerhope.com/btips/desktop.htm

Helpful Laptop Buying Guide
http://reviews.cnet.com/laptop-buying-guide/

DESKTOP
PROS - stable, you might be used to having one and just want to replace it. If you do not use WiFi in your home and your computer plugs into the Internet with an Ethernet cord a desktop is a good answer.
CONS - With a desktop you are tethered to one spot. You cannot bring your computer with you anywhere.

LAPTOP
PROS - Can do everything a desktop can do. Is portable so you can work anywhere. If you have WiFi in your home you can sit in any room or even use it in the kitchen. 
CONS - The screen size is more limited than a desktop. Laptops are too heavy with a large screen. 

TABLET: Pad, Nexus, Surface, Asus, etc... 
PROS - Tablets have a touchscreen, which can be a good thing. Make sure to try it out at a store to see what you think about it. They are lightweight and easy to bring anywhere. They have a camera built in so you can take pictures and store them there or upload them to Picasa or another program online. There are a lot of apps that you can download for free.
CONS - For lots of typing with it you may want to purchase a separate keyboard. It is possible to print from these, but not easy to set up. 


Thursday, October 17, 2013

Using YouTube to Learn

Last week I worked with several people who wanted to know more about Excel. I know the basics of Excel and use Spreadsheets regularly. I use the basic formulas and often use it as a fancy table.

I am comfortable using Excel 2003, but it has changed quite a bit.  It still does the same things that it did before, but it has a new ribbon menu that is confusing to me.  I could get used to it. I just need to take time to practice and use it.

So, I decided to learn on YouTube. YouTube has short videos on about anything that you would want to learn as well as lots of entertainment videos. Here is what I did:

1. I opened up Excel to a blank page.

2. I opened up a browser (Internet Explorer, Chrome, Firefox, or some other program that will get me to the Internet) and went to YouTube

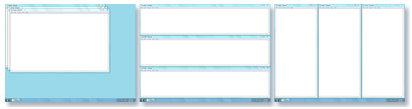
3. I right clicked on the task bar (the bar across the bottom of the screen) and chose to show the windows side by side so that  I could see both of them at the same time. You can set up the windows to cascade,
show stacked or side by side.


4. I searched on YouTube for what I wanted to learn. I started out by just typing Excel in the search window and then selected videos that seemed like they might be helpful.


5.  I ran the video and paused it to try things out using the Excel program that was open on the other side of the screen.

6.  If there were things that I already knew in the video I fast forwarded past them by dragging the scrubber to the next point in the video that had something of interest.

My Favorite was How to Demystify the Ribbon because it went over using the ribbon in an organized and helpful way.


Tuesday, February 26, 2013

Clean Up and Maintenance of Your Computer

This is one of those important things that no one tells you to do and you always feel uncomfortable knowing that there is probably something you should be doing. Then if your computer breaks down one day you think it must be your fault. 

Actually taking good care of your computer is not too difficult or confusing. There are things that you can do beyond what I talk about here, but they are not necessary for most home users. See links below if you want to know more.


There are things that EVERY computer owner should do regardless of if you are using Mac or PC and then a few specific things to each operating system.

  1. The MOST important thing to do for any computer is to BACK UP regularly. It can (and does) happen that your computer completely shuts down. You do not want to lose all of the files that you have on your computer, so it is important to have a second copy. You can use an external hard drive, a CD or DVD, or somewhere on the Cloud using a service like Dropbox, iCloud, SkyDrive, Google Drive or one of the many others. Here  is a link to several reviews of free back up software. http://www.techsupportalert.com/best-free-backup-program.  When you back up your files are all backed up so that you can get to them again, but not your programs. If you want to have a backup of all of your programs so that you do not have to download them individually again you can use Acronis or Norton Ghost which will "take a snapshot" of your whole hard drive. 
  2. Physical cleaning of the outside of your computer. This is important because the crumbs that get into your keyboard, the dust that gets into the fan and the general grime can cause your computer not to work as well as it can. Here are suggestions for each of the parts.
    • Screen - Use screen cleaner that does not have ammonia or alcohol. For a laptop, set the back of the screen onto a towel or something soft on a table while holding up the keyboard with one hand. Spray the cleaner onto a soft cloth and clean the screen gently with a circular motion.
    • Keyboard - Using a similarly damp cloth clean the outside of the keys. Use compressed air to clean out the crumbs and dust that collects under the keys. You can use an antibacterial wipe on the keys since lots of hands touch a keyboard.
    • Wipe outside with the damp cloth.
    • Clean up the files on your desktop by either putting them into folders that are meaningful OR moving them to other folders in your file system. Each thing on your desktop takes up some of the memory that your computer needs to run. Your computer can slow down if there are too many things just left on the desktop.

    Always do the updates that your computer recommends. Most of the time a window will pop up saying that you should update something and you can press OK or cancel. If you always cancel these things you may be stopping your computer from doing some things that can really help.


    One more good habit to get into is to empty the trash weekly or even daily depending on how much you use your computer. Everything in the trash is taking up some of your memory until you empty it out. The whole reason that the trash can exists is so that you can change your mind and drag something back out of the trash if you decide that you need it. Once you are sure that everything is not needed empty what is there so that it does not take up space.

    Use a surge protector for plugging in your computer. If the electricity is interrupted (like when you are struck with lightening) it will protect your computer from burning out.

    Completely shut down and restart your computer regularly (maybe overnight?). When your computer shuts down and restarts many things happen in the background that clean up some of that background stuff that the computer automatically does.

    PCs (by this I mean any computer that is not a Mac. It could be IBM, HP, Dell or one of many other companies. You should add these practices to the above in order to maintain your computer. 
    • Make sure you have a good Anti-Virus program and that you keep it up to date. There are lots of Anti Virus programs that you can download and you probably have one that came with your computer. There are free ones  http://www.techsupportalert.com/best-free-anti-virus-software.htm and also ones that you can pay for like Symantec, Norton or Barracuda. Do not load more than one on your computer because they can conflict with one another and will not be effective. 
      • Regularly download updates because hackers are always busy creating new ways to get into your computer. If you want to avoid getting a virus there are a few things that you can regularly do. 
      • NEVER open links from email if you don't know the person or even if you know them and they JUST sent a link with nothing else. There are hackers that send out email with a link and make it look like it is coming from someone safe. The link might open to a website with an automatically downloading virus 
      • Do NOT trust any email from a bank, PayPal, Amazon, Western Union, or any company that looks legitimate, but tells you to give them an account number, send them money or anything that sounds fishy. It probably is a scam. There are lots of these going around and it is REALLY easy to click on a link from one of these to find out more, but it is better to just delete them. If it is from a real company they will NEVER ask for personal information like account numbers in email. You can often look in the TO: section at the top to see who it was sent to. If it was sent to a bunch of people that you do not know it is spam.
    • Defragment your computer hard drive monthly. As you save, delete and move your files around they create gaps in the hard drive space which are not used because they are small bits stuck inbetween other stuff. Defragmenting pushes all of the stuff together creating more open space. This is less important than it used to be since Hard Drives are bigger than they used to be, but it might help if your computer is running slowly. The Defragmenter is on your computer. Most likely you will find it under System Tools-disk defragmenter.

    On a Mac
    1. Remember the things above that appled to both computers. Macs have TimeMachine installed which can do your back ups on a regular basis. There are some features of other programs that you can pay for which TimeMachine does not have. Macs get fewer viruses, but it can still be an issue. You can pay for a virus protection program or get one free. Here is a link to a free one: http://www.sophos.com/en-us/products/free-tools/sophos-antivirus-for-mac-home-edition.aspx
    2. If your Mac gets slow and bogged down there are a few things you can try to see if they will help. Your Mac has something called Disk Utility which is a program that you can run to see if there are any problems on your hard disk and it will fix them. You can find it by clicking on Mac HD, in the Applications File under Utilities. You can also run a program like Onyx which can clean off the HD of any issues that are slowing it down. Some articles I read called for using the Disk Utility regularly, like every three months. 
    MacWorld's Maintenance Calendar - MacWorld offers a free download of a calendar to remind yourself when to do different maintenance tasks. http://www.macworld.com/article/1133696/maintenance_cal.html

    For even more on cleaning your mac look at this MacWorld article:


    Tuesday, August 28, 2012

    Creating a Collage in Adobe Photoshop Elements

    CREATING A COLLAGE
    USING ADOBE PHOTOSHOP ELEMENTS


    1. Search for images: Go to http://images.google.com/hosted/life  to get images from the Life Magazine Collection that Google has digitized.

    2. Now create a folder on your desktop and save the photos that you want to use for your collage.
    • Go to desktop of your computer.
    • Right click and choose NEW-FOLDER
    • Name your folder PHOTOS
    • Go to the link above.
    • Select 5 interesting photos or more
    • As you find them right click on each one
    • Choose SAVE AS and put them into your folder on the desktop.

    3. Import those pictures into Photoshop Elements.
    • Open Adobe Photoshop Elements
    • Choose EDIT
    • After the window opens up choose FILE>NEW>BLANK FILE
    • Name your new file by typing in a new name at the top of the window that comes up.
    • Pull down where it says “preset” and choose “Photo” for size choose 8” by10” and resolution 300. Then Click OK.
    • You should see a large white space that we are going to use as the background.
    • Open the pictures you saved by choosing FILE>Open and finding the pictures you want to use. Highlight them and choose Open. You should see them open along the bottom of the screen. If you don’t see them go to the menu at the top called Windows and make sure there is a checkmark near Project Bin.
    Creating your Collage

    Put pictures onto the background that you created by dragging them up from the bottom of the screen.

    Each time you add a picture a new layer is created. You can edit and move around each picture without changing any of the other layers.

     If you do something to a layer that you do not like look to the far right side of the Layers Window and click on the down arrow.  This menu will allow you to delete the layer. Start over by adding the picture back in with either FILE>OPEN and finding the picture or dragging and dropping the picture from the Project Bin again.

    Use the tools to edit each of the pictures to make them look the way that you want them to for the collage. You can resize them, rotate them, crop them, or choose from the many special effects. See the next page for a summary of the tools.

    When you are happy with the results you need to FLATTEN your picture which will paste all of the layers together making ONE picture and then save it.


    Tools

    You can use these tools to edit your photos. Any of them that have a small triangle at the corner have several options. Hold the mouse button down on them and wait until all of the choices appear.
    Move Tool-You must have this to move the image or rotate it.
    Hand Tool

    Square select tool-hold the mouse on it to see it become the Elliptical Select Tool
    Magic Wand Tool-Click on a part of the picture to select all of the part that is the same color.
    Text Tool-Use this tool to create text on the picture,
    Cookie Cutter Tool-This tool cuts out a piece of the picture in the shape that you choose.
    Red Eye Tool-Automatically removes red eye from photos.
    Clone Stamp Tool or Pattern Stamp Tool-This tool is very useful for editing a picture
    Brush Tool-Several Brushes to choose from.
    Paint Bucket Tool-Spills colors defined in boxes at the bottom.
    Rectangle Tool-Has many other shape options.
    Sponge, Dodge and Burn Tool
    Foreground and Background Colors-Click on the box to change hem click on the arrow to switch between foreground and background.
    Magnifying Glass-Option click on Mac or Rt click on PC to minimize.
    Eye dropper tool-Use this to select on color from an existing photo. It becomes the foreground color
    Lasso Tool-select a unique shape. Also has a Magnetic Selection Tool.
    Quick Selection Tool-Try it!  You’ll like it!
    Recompose Tool-Does amazing recomposing of pictures automatically!
    Straighten Tool

    Healing Brush Tool

    Eraser-Hold down your mouse to see the special erasers. Try the Magic Eraser!

    Smart Brush Tool

    Gradient Tool

    Blur, Sharpen, Smudge Tool

    Adobe TV
    There are video tutorials on these tools showing what they can do and how to use them. http://tv.adobe.com/show/learn-photoshop-elements-10/

    Creative Commons
    http://creativecommons.org/ You should always cite where you get your images from and be aware of the copyright. Creative Commons is a way to show that work can be shared in different ways. Everything you create is automatically copyrighted. People are not supposed to use your work without your permission. You can give your photos a Creative Commons License.