LET'S MEET ONLINE

LET'S MEET ONLINE! Call (512)560-2609 or email helpimnotageek@gmail.com and set up a time for a session. It works really well. We talk on the phone while I see your screen.

Wednesday, December 19, 2012

Keeping a Christmas Spreadsheet

I don't know about you, but I can never remember what I gave to someone from year to year. I will go to the store and see something and think, "That would be perfect for Susie", but I am not sure if I get it for them every year, or if it is a new idea.


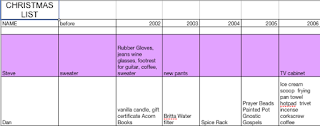
So I have started to keep a gift spreadsheet. It is very simple. In the first column I type the name of each person I want to give to each year. Then across the top row I type the number of the year. Then every year at Christmas shopping time I get out the list and I can see what I have gotten people for the last several years. I then add a new column for the current year and enter what I am giving this year.

This could also be done for gifts that you receive. Start by typing names of people that you have received gifts from in the first column. In the second column you could type what gift you received. The third column could be for checking off that you have written a thank-you note.
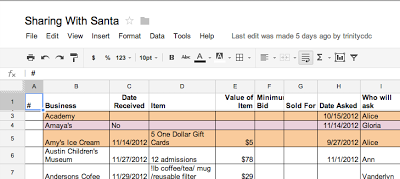


We use Google Spreadsheet in order to share the information for a silent auction for Child Development Center. On this shared spreadsheet we collect lots of information. Some of the columns include the item donated, the value of the item, the value of the minimum bid, how much it sold for, the address of the business, who found the donation and a place to check off that thank you notes were written. This is really handy because we all have access to the spreadsheet and can enter our information as soon as we find a donation. We can also look at the list to see what companies have already been asked, so we are not sending people to ask for donations to the same businesses and irritating them. Each year we start a new sheet of the spreadsheet, so that we can compare how we have done from year to year.


You can create a Google Spreadsheet by going to http://drive.google.com and then signing up for a free account. Once you are into the program you can choose if you want to make a webpage, write a document, create a spreadsheet or create a presentation. All of these programs work similarly to the programs you have used in the past. The main difference is that they save automatically on the cloud (Google's server bank) and you can share them with someone else. You can give the other person the option to edit the document or limit them to just reading it. You can also make the document private so that only you can see it.
Take a look at Google Drive and let me know what you think about it and if you have questions for me to research.

And finally Merry Christmas.

I hope you have a wonderful break

and can spend some time with family

doing things you love.


Tuesday, December 11, 2012

Security Settings for Kids


One cannot protect their kids from every harm that may come to them. The most important thing is to love them and to be there for them. However, there are a lot of things that you can do as a parent to minimize the problems they might have online and to maximize your time and communication with them about how they spend their time online.


PLACEMENT OF THE COMPUTER
Do not set up a computer in your child's bedroom. All computer devices should be used in the central part of the house where anyone could see what is on the screen. You should be able to casually walk by and see what is happening on the computer. 

COMPUTER SET UPAll computers and devices have ways to set up different identities with different rights. If there is a family computer that several people use, set different personal log ins for each person. Each log in will have a different password so that your identity will not be available to your kids. On their identity you can set it up so that they cannot download or purchase items. You can also adjust the level of different things like sex or violence that is allowed. Remember that this is not perfect. There are always things that cannot be controlled.

BROWSER SETTINGS
All browsers (Internet Explorer, Firefox, Chrome, Safari, etc...) have settings that you can change that block out certain websites from searches. 

COMMON SENSE MEDIA  
http://www.commonsensemedia.org/
Common Sense Media is a non profit organization that reviews media (movies, TV, apps, books, games, websites, and music). They are very clear that they do not tell you what to think, but give you a way to decide what you think about different things. They are for media-sanity not censorship and their webpage says,"We can't cover their eyes, but we can teach them to see." The emphasis here is on discussion and understanding rather than blocking certain things. One parent I  know said that after a while his daughter went directly to Common Sense Media to read the reviews before asking if she could go to a certain movie.
Each item is rated on these things:
  • Positive Messages
  • Role Models
  • Violence
  • Sex
  • Language
  • Consumerism
  • Drinking, Drugs, Smoking

It is easy to browse by many different qualities:

  • Age of Kids
  • Type of Entertainment (movie, game, app, etc...)
  • Genre (action, comedy, etc...)
  • Topics (dinosaurs, magic, sports, etc...), and more.

There are also  many advice articles and videos on things like screen time, multitasking or keeping kids safe online.

COMMON PROBLEMS AND SOME IDEAS

1. Sharing too much information with others - Have talks with your children about the importance of not sharing personal information online. The law says that children must be at least 13 before signing up for different sites on the Internet, but the responsibility for that is put on the companies offering services. Usually they just have a place where the person registering has to enter their birthday. It is quite easy to enter a birthday that makes you old enough to register.  Talk to your children about this and make sure that they have your approval before signing into any sites. Facebook is a good example. You can tell your children that they cannot have an account until they are 13 and make the point that it is not your rule, but actually a law. Once they do sign up think about having access to their account (their password) so that if it is necessary you can access it. You don't want to be constantly "spying" on them, but there may be an occasion where it would be helpful to have that access.

2. Getting into forbidden spots on the Internet - First set up whichever browsers you use (or all browsers on your computer) to the settings that you want for your children. Then be sure that they are aware that EVERYTHING they do on the computer is recorded. It is possible to trace back where they  have been and what they have done. One simple way that you can do this is to check the History on the Browser. In Firefox this is one of the menus at the top of the screen. Beware though, the history can be deleted. All of the information is findable by a specialist at a cost, but it is not as easy.

3. Downloading copyrighted material - According to current Copyright Law everything published on the Internet (or anywhere) is copyrighted. It is NOT OK to save images or copy and paste someone else's text without asking permission. There are ways to find images through Flickr, Google, and many other places that are marked with a Creative Commons license. This is a type of copyright that allows you to use the work for different uses without asking. Usually the license spells out what you can use and what you can do with it. If there is something that you want to use that is not licensed with Creative Commons you can email the owner and most of the time they are flattered and will let you use it. Wikimedia is a great place to look for pictures that can be used!

4. Using the Internet to do schoolwork - Caution is the main thing to use here. The world has changed and new information is discovered and published on the web every day. It is a terrific place to learn all kinds of things. Wikipedia, for example, is a great place to find lots of information. However, it can be inaccurate. It is true that ANYONE can add to an article in Wikipedia. It is also true that it is constantly being curated by thousands of energetic people who want it to succeed. The only way to be sure about accuracy is to "triangulate" or find two other places that have the same information.  Help your kids to be careful about what they trust on the Internet and to be able to "read" where a webpage comes from or who wrote it.


Common Sense Media has a  Holiday Gift Guide
http://www.commonsensemedia.org/guide/holiday-gift-guide-2012

Monday, November 12, 2012

Wiping out your Hard Drive-on Purpose

PICTURE of a Hard Drive
A HARD DRIVE
A friend recently asked me this question: "I want to give my computer to someone else, but I need to back up and then wipe out the Hard Drive first. How do I do that?"


Mac

First you need to back up all of your information from the hard drive. You need to think about any software that you have purchased or downloaded and your own files. Since you will be deleting all of this you will want to make sure you have a way to transfer them to another computer. If you have your new computer you can just transfer files from one computer to the other. You can see my post about backing up to learn more.


Also delete all of your files and folders from the computer. Most of these are probably in My Documents, but you may have saved things in other places like the Desktop. To delete you right click on the file and choose "Move to Trash" or "Delete". If you are using a Mac after everything is deleted you can empty the trash to get rid of the files from there.

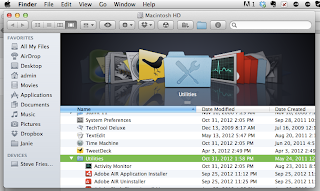
Next use the Disk Utility that is included in a Mac to securely erase your computer. To get it go to Applications>Utilities and look for Disk Utility. If you choose the Secure method it will overwrite your hard drive so that the files cannot be accessed. You can run it several times to be sure that everything is clear.


PC

First you need to back up ALL of the information on your hard drive. To do this you can use a software program like Nova Back Up. You probably need to do this onto a separate Hard Drive. You can see my post about backing up to learn more.

Find the disks and licensing numbers (OEM number) that you used to connect to your printer and to install Windows. 

If you are giving away this computer you can use a program like Erase to wipe the machine so that your files cannot be found on it. 

Erase  http://eraser.heidi.ie/

If you are planning to reinstall and reuse the computer yourself here are some things to remember:

Be prepared to install dozens of patches after everything has been installed. It's very important that you do all Windows updates after installing a fresh copy of Windows on the computer.
Have installation discs or be prepared to download an antivirus immediately after installing Windows.
Finally, realize that re-installing any operating system to the point of completion is going to take several hours to complete.

Friday, November 9, 2012

An Update

I have been working on a post about "Wiping Out a Hard Drive on Purpose", but it is not done yet and I want to make sure to get something up by Friday every week. 

So, today I have decided to talk to you a little bit about how it has been starting a business. 

There are ups and downs. When someone calls and says they want to hire me that is exciting. When I talk to people and they like the name of the business that makes me feel good. However, there are days when there is not much going on and I have to force myself to keep working on it. When does the "word of mouth" begin?

One thing that a friend who is in business for herself suggested was to take advantages of any chance I had for networking and that has been really fun. I have met lots of new people and seen new things. I am going to start listing some of the start up businesses of others I have talked to on the sidebar of this blog. Yesterday I attended the Innotech Conference at the Austin Convention Center. I learned a lot of new things and met interesting people. One thing that I especially learned was about Windows 8. I have seen ads on TV showing how different it is, so I really enjoyed trying it first hand and going to a session where they talked about it and I could ask questions. If you are upgrading and need some help with Windows 8 I will be ready.

I also learned about a software that will allow me to work with people virtually. We could connect on the computer and communicate that way and then if I needed to I could, with your permission of course, have access to your computer. It is called Link and would cost me a small monthly amount, but you would not have to pay anything.

Other things I have been doing are substitute teaching at University of Texas Elementary School, volunteering with Trinity Child Development Center, making phone calls for Lloyd Doggett (a local candidate for Congressman) and working the Election Day Polls. That was an experience. 

So, next week you can look forward to Wiping Out a Hard Drive on Purpose. Please send along any suggestions for topics.

Wednesday, October 31, 2012

Locked out of my Own Computer!!

Here is a question a PC user asked me:

"Someone played around with my computer and I can't log in any more. It keeps giving me the hint question and when I type in the correct answer it keeps telling me that it is not correct. What do I do?"

This is something that happens to people and so there are lots of places to look online to find help. Unfortunately if you have been locked out of your computer you cannot get online to get help or even see this blog. 

In the hopes that someone with this problem can find this blog I will put the solution that I found online here.  Since there are a lot of different versions of Windows this may or may not apply to your computer. It is advice for someone with Windows XP who has not put in an Administrator password.

I have not done this, so I cannot be sure that it will work. In fact, there may be many different reasons that you are locked out of your computer, but this is the first thing to try:

1. Boot up (Turn On) your computer.


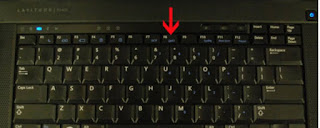
2. Before it starts up hold down F8. This is one of the keys on the top row.


3. When it starts up you will see a black screen with white words.  It will ask you if you want to start in SAFE MODE.

4. Choose to open in SAFE MODE.

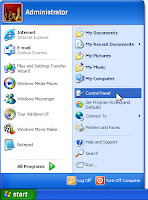
5. It will take a while, but when it opens you should see the regular desktop and be able to get into an account called Administrator. Usually a new Windows computer is shipped out with an Administrator account with no password. If you have not put a password onto it you can still get in as an Administrator which will allow you to do anything you want.

6. With this account you can go to the Control Panel and remove or change the password of the user that you usually log into.

One other video on YouTube that I watched showed how you can just type in Administrator into the log in window that comes up. If no password has been set you can just click OK and it will open up the computer. To change any password at that point you can go to the Control Panel.

If neither of these things works for you I am sorry to say you may need to take it in to someone professional who can help you.

Tuesday, October 23, 2012

Gmail Offline and Fun after Fifty!

 GMAIL OFFLINE

I am traveling today and I am also behind in reading my email. I want to catch up while on the airplane, but I use Gmail.

For anyone who is new to email/webmail I want to explain that there are two types of email: Webmail or eMail on your computer. For both of them you have to be online for them to get your new mail and send mail that you write. eMail on your computer can be opened up without getting online, but it does not give you any new mail. It keeps track of anything you write and when you are next online all of it is sent. Webmail only works when you are online.

Until now I thought that because I was using Gmail I only had webmail. That meant that when I was flying I did not have access to my email. That was the first thing that made me unhappy with using Gmail.

Now there is a way to create a mailbox on your computer that can keep up with your Gmail. Unfortunately it only works with Gmail on Google Chrome, so if you have another webmail program you are out of luck. Google Chrome is a browser. [A browser is something that connects you to the Internet like Internet Explorer, Safari, Firefox and others]. I use Firefox usually and really like it, but for this I have switched to Chrome.


First I had to set it up. I had to go to Firefox and search for Chrome. Then I had to download Chrome. It is free, but takes some time and space on your computer to set up. 


When I opened Chrome I had to click to open a new tab so that I could see the Google Web Store Icon. Google offline is an Add On to Chrome which is sort of like an app that works inside the Chrome program. You have to go to the Chrome Store to get it, but it is free. When you have opened Chrome click on the shopping bag to get to the Chrome Store. 

At the store search for "Gmail Offline" and a list of Add Ons will show up. 


The top one is Gmail Offline. You can click on it for more information which will take you to a new window with more information or just click on the button that says, "Add to Chrome". 

 
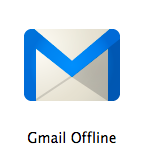
As soon as you do this the blue M shows up on the Chrome page which had only the shopping bag on it before. 


Now if you are somewhere where there is no Internet access you can open Chrome, click on the diamond shape next to the tab and open up a new tab. On the new tab you will see the shopping bag, gmail offline and other add ons that you have chosen to add. When you click on the blue M it will take you right to your email...offline!!


CHROME ADD ONS
 
One other thing I learned while doing this is that there are all sorts of other Add Ons for Chrome. I need to explore them more to see what is there, but there seemed to be hundreds. One that sounded interesting to me was a remote access app. It would be nice to be able to help people over the phone with their computers and the software I have seen to do that is $40 a month. However, this application (and maybe the others also) makes your computer readable by the company that owns it. They can get all sorts of information from my computer and I did not want to risk that yet. 

FUN AFTER FIFTY
 
As I try to get this business off the ground I am meeting lots of interesting people and today I want to tell you about one of them. Jackie has started a blog called Fun After Fifty (http://www.funafterfifty.com). In one post she says, "My passion is to help people approaching or past the age of fifty to thrive rather than just survive life. What’s your passion?" She told me that she often meets people over 50 who have given up. I guess that they feel that they are past the first half of life and on a downhill slide. She wants to meet people and help them for free! Eventually she hopes to get sponsors that will help her pay for her business. Check it out!

I hope to hear from you.  I need more suggestions of what to write about. I will gladly take time to research and come up with an answer to your issue. Comments of all kinds are welcomed!


Wednesday, October 3, 2012

FREE Ways to Word Process, Collaborate, etc...


TWO STORIES 

At the end of September my son got married. He lives in Ohio and we are in Texas. We were helping him plan and design the ceremony. Instead of sending files back and forth or using lots of email David set up a Google Doc and invited us to share it. We could all work on it at different times or even at the same time in order to collaborate!  Amazing!


Recently I updated my MacBook to Lion, but to my unhappy surprise I found out that it does not support Microsoft Office. It has something to do with programs that used the Intel chip... I can't explain it... I'm not a Geek, but anyway there I was without some expensive software that I used all of the time. (side note: now when I receive an excel or word document I have to open up the Open Office first and then use File-Open to find the file and open it up.


You wonder what these two stories might have to do with each other?  Well, it is just that there are so many ways to get around having to use expensive software to do word processing, spreadsheets, and presentations now!

In this post I want to share with you some of what  I have done to fill in the gap from the software that no longer works on my system.

ONE

I downloaded a free program called Open Office. It is very similar to Microsoft Office, but it is Open Source which means that anyone can work on the code of it and make it better and it is FREE! I have been using it regularly for word processing. I have not used spreadsheets or presentations or anything else yet, but I think it will be fine. When I save something in Open Office I have to remember to change the format before saving because it has its own format (.odt) which other programs cannot open. When I save under "save as" I choose .doc and so far it seems to save everything just fine. 

TWO

I have been using Google Docs and Spreadsheets. The biggest benefit of these programs is that they can be shared online with others. You can give them rights just to look at the document or to edit it. You can make it public, so that everyone can see it or make it private so that you are the only one who has access to it. Google has just updated to Google Drives which I have not worked with much yet. It looks to me like you can download all of your Google Docs into a free software on your laptop. Then when you are not online you will still have access to your Docs and you can work on them. Then when you are online the newest copy syncs so that you have the same copy in both places. 

One drawback of using Google Docs is that you will be relying on Google to keep all of your stuff. It is all saved on one of their servers. If this is a problem for you avoid Google Docs. You will not have total control of everything. 

However, it is probably safer, in terms of not losing your documents because their servers are duplicated and regularly backed up. You can ALWAYS get to your stuff. It will be accessible even if you are in a flood or a fire and loose everything. You can access it from anywhere on any computer. 


  THREE

For some presentations I have started using Prezi. It is a whole new way of presenting ideas based more on networking thoughts and graphics together rather than presenting them in a linear way. The best way to see what it does is to go to their website and see some of their samples. 

So, we are getting to the point where we do not need expensive software to do the basic things that we want to do! 

Tuesday, September 25, 2012

Should I Upgrade my iPhone to iOS 6?

While I was at my son's wedding this weekend I kept getting messages when I turned on my phone that a new operating system was available (6.0) Normally it is good to just download the newest one, but I decided to do some searching online first to see what people were saying.

One person said that it took a long time (45 minutes). I am glad I didn't just start it downloading when I first saw the message.

The biggest complaint is that Apple has decided to try to keep Google out of its phone, so it created its own Mapping App and got rid of YouTube. The default map that was on the phone was a Google Map, but with iOS 6 and on the new iPhone 5 it will be Apple's Map App. You cannot even download the Google Map if you wanted to. People do not like the Apple Map App. There are complaints that it is not accurate enough and that it is inferior to what people have gotten used to using. Since the map is one of the things that I use the most the thought of getting rid of it is not a good one. 

The second complaint is that the new Operating System is not that much of a change from the earlier OS. One article said that it was "evolution rather than revolution".

There are some good things too. When a phone rings and you cannot answer it you have a choice of quickly sending a preset text so that the other person has an idea why you did not answer. There is a "Do not Disturb" feature that you can set so that you do not get calls in the middle of the night or whenever you may not want to. It has improved Siri so that she can actually text for you and do things like make reservations. It has increased connections with Facebook and Twitter. You can send a Facebook update or a Tweet without going into their applications online. However, these things are not enough to make for a big change. 

I think I have decided to wait a bit. I like the way my phone is working now. Who knows, they might come out with a better iOS with some of these things corrected.

Tuesday, September 18, 2012

To Post or not to Post?

Allison Morris saw the earlier post in this blog about posting to Facebook and kindly offered an infographic about the same topic which I have put below. It is from http://OnlineClasses.org. I like that it was copyrighted under a Creative Commons License so that it can be shared as long as they are given credit. It is good to be aware of this so that you can be careful about copying things that may be copyrighted and so not free to use.

Info Graphic about posting on Facebook

Look at their site to find the original.


Monday, September 10, 2012

How to Back Up your Computer

The best way to learn how important it is to back up your computer is to lose everything once. Most people have to go through that in order to learn, but not YOU. Starting today you are going to be careful about regularly backing up what matters to you.

WAYS TO BACK UP
1.  Put everything that you want to back up on "the cloud".  A good example of this is Google Drive. The slogan that they use is "Keep Everything, Share Anything". 

This is the easiest way to back up, but remember that whatever is put onto Google Drive is actually being put on a Server (a type of computer) somewhere owned by someone else.

I am very aware that much of what I am working on is already kept on "the cloud". I use Blogger.com to write this blog and so all of the content that is here is kept on a server somewhere that Blogger (actually Google) owns. I also have some pictures online using Flickr and some with Picasa. I often use Google Docs and whatever is done there is "on the cloud".

2.  Get a separate hard drive that you can plug into your computer and create a back up.

Of course if you back up using a hard drive it is important to realize that the hard drive should be kept in a different place than your computer. If there is a fire and you lose BOTH the computer and the hard drive, the back up will not help much. Some people recommend that you have three copies of everything (a double back up) so that at least one copy will be left if something happens. 


Most computers have a back up utility that will help walk you through the process. It is different for every computer, so I will not try to explain the details of how it works. You can either use the Utility that comes on your  computer or you can purchase a program that will walk you through the steps for backing up. I will give you one example, I use Time Machine on my MacBook.

I have purchased an external hard drive. The first time I plugged it in I opened the Time Machine program on my Mac and set it up to back up on that drive. Now every month or so I plug it in and my Mac automatically copies everything to the External Hard Drive. Time Machine backs up all of my programs, settings and data files on my computer. If something happened to my computer I could remake it with the Hard Drive. I really don't have to think about it much and it is easy to do. If I kept it plugged in all of the time it would do regular backups every hour.

In some computers the Utility (built in back up program) may be confusing, so it may be better to purchase a backing up program (something similar to Time Machine, but for PC) so that it will do the steps for you and make it easier. 

Some recommended programs that you can purchase for backing up your computer are:

http://data-backup-software-review.toptenreviews.com/ - This site reviews the top ten back up softwares for 2012.

http://www.pcworld.com/article/148765/save_your_data_with_one_of_these_top_backup_programs.html
This long URL may need to be copied and pasted into a browser to work. It is an article on PC World talking about 5 of the best Back Up programs.


Some places you can get external hard drives:
Go to these sites and search for external hard drive.
 
Amazon.com - http://www.amazon.com/

Newegg.com - http://www.newegg.com/

Office Depot - http://www.officedepot.com/

Best Buy - http://www.bestbuy.com

External hard drives come in different sizes. Some are in Gigabytes (GB) and some are in Terabytes (TB). All of the drives that I looked at came in at least 350 Gigabytes. That is plenty of memory for backing up most computers. If you are doing podcasts or making movies you may need more memory.

Tuesday, August 28, 2012

Creating a Collage in Adobe Photoshop Elements

CREATING A COLLAGE
USING ADOBE PHOTOSHOP ELEMENTS


1. Search for images: Go to http://images.google.com/hosted/life  to get images from the Life Magazine Collection that Google has digitized.

2. Now create a folder on your desktop and save the photos that you want to use for your collage.
  • Go to desktop of your computer.
  • Right click and choose NEW-FOLDER
  • Name your folder PHOTOS
  • Go to the link above.
  • Select 5 interesting photos or more
  • As you find them right click on each one
  • Choose SAVE AS and put them into your folder on the desktop.

3. Import those pictures into Photoshop Elements.
  • Open Adobe Photoshop Elements
  • Choose EDIT
  • After the window opens up choose FILE>NEW>BLANK FILE
  • Name your new file by typing in a new name at the top of the window that comes up.
  • Pull down where it says “preset” and choose “Photo” for size choose 8” by10” and resolution 300. Then Click OK.
  • You should see a large white space that we are going to use as the background.
  • Open the pictures you saved by choosing FILE>Open and finding the pictures you want to use. Highlight them and choose Open. You should see them open along the bottom of the screen. If you don’t see them go to the menu at the top called Windows and make sure there is a checkmark near Project Bin.
Creating your Collage

Put pictures onto the background that you created by dragging them up from the bottom of the screen.

Each time you add a picture a new layer is created. You can edit and move around each picture without changing any of the other layers.

 If you do something to a layer that you do not like look to the far right side of the Layers Window and click on the down arrow.  This menu will allow you to delete the layer. Start over by adding the picture back in with either FILE>OPEN and finding the picture or dragging and dropping the picture from the Project Bin again.

Use the tools to edit each of the pictures to make them look the way that you want them to for the collage. You can resize them, rotate them, crop them, or choose from the many special effects. See the next page for a summary of the tools.

When you are happy with the results you need to FLATTEN your picture which will paste all of the layers together making ONE picture and then save it.


Tools

You can use these tools to edit your photos. Any of them that have a small triangle at the corner have several options. Hold the mouse button down on them and wait until all of the choices appear.
Move Tool-You must have this to move the image or rotate it.
Hand Tool

Square select tool-hold the mouse on it to see it become the Elliptical Select Tool
Magic Wand Tool-Click on a part of the picture to select all of the part that is the same color.
Text Tool-Use this tool to create text on the picture,
Cookie Cutter Tool-This tool cuts out a piece of the picture in the shape that you choose.
Red Eye Tool-Automatically removes red eye from photos.
Clone Stamp Tool or Pattern Stamp Tool-This tool is very useful for editing a picture
Brush Tool-Several Brushes to choose from.
Paint Bucket Tool-Spills colors defined in boxes at the bottom.
Rectangle Tool-Has many other shape options.
Sponge, Dodge and Burn Tool
Foreground and Background Colors-Click on the box to change hem click on the arrow to switch between foreground and background.
Magnifying Glass-Option click on Mac or Rt click on PC to minimize.
Eye dropper tool-Use this to select on color from an existing photo. It becomes the foreground color
Lasso Tool-select a unique shape. Also has a Magnetic Selection Tool.
Quick Selection Tool-Try it!  You’ll like it!
Recompose Tool-Does amazing recomposing of pictures automatically!
Straighten Tool

Healing Brush Tool

Eraser-Hold down your mouse to see the special erasers. Try the Magic Eraser!

Smart Brush Tool

Gradient Tool

Blur, Sharpen, Smudge Tool

Adobe TV
There are video tutorials on these tools showing what they can do and how to use them. http://tv.adobe.com/show/learn-photoshop-elements-10/

Creative Commons
http://creativecommons.org/ You should always cite where you get your images from and be aware of the copyright. Creative Commons is a way to show that work can be shared in different ways. Everything you create is automatically copyrighted. People are not supposed to use your work without your permission. You can give your photos a Creative Commons License.

Friday, August 17, 2012

Searching With Images

I just learned something new and really interesting. You can search Google using images instead of words! 

You just go to Google.com and choose IMAGES from the top of the screen. The Google Images search shows up (like the one above). 

Click on the little camera in the window where you would usually type in a search term. 

Then find the image you want to use and drag and drop it into the spot that Google opens up for you.


The results are interesting. I found that Google matches the color of the image and finds other images that have a similar color palate.

Here is the image I used.


And here is the result:


Try it out! It is fun!

Monday, August 13, 2012

Getting the Most out of your iPad


Tomorrow I am doing an iPad seminar for Austin Computer Learning Center. I have created a handout for the session and I think it might be helpful to share it here. Please ask questions!  You can do it by pressing the word COMMENT at the bottom of the blog post and typing in the window that comes up. You can do it anonymously or sign up if you want to.

Setting up your iPad


The set up icon looks like this and can usually be found in the bottom row of icons.


Use settings whenever you want to set something up. 


Under the category of General you can find:
  • eMail
  • Clock
  • Calendar
  • iCloud
  • Gestures
  • Brightness and Wallpaper

There is also set up available for all of your apps. It is a good idea to click into all of these and see what they can do for you. You can always get back to the original setting if you change anything by accident (or on purpose!)


Getting Around

The HOME Button - Whenever you are done with an app click on the home button to return to the desktop with all of your apps.

This does not close the application. To do that you need to use 4 fingers and slide the screen up. All of the applications that you have used should show up there.

Hold your finger down on one of the icons until all of them start jiggling and have the red minus sign next to them. Completely close the programs by touching the red minus sign one at a time. To get rid of the - signs click once on the home button.


What is on my iPad?
The iPad comes with some interesting apps.

  • Weather
  • Clock
  • Map
  • Contacts
  • Safari
  • Calendar
  • Notes
  • Camera

In the session I will take a little time to show each one of these and answer any questions.

The Search Window

When you are looking for an app, but do not see it you can just swipe to the right to get the search window. Type in the name of what you are looking for and it will show up in a list.


Typing

Anytime you click on something and have a cursor the keyboard opens up. The keyboard is sensitive and takes some getting used to.

If the keyboard is in the way just press this key and it will disappear. 


Gestures

You must turn this on in settings. Under GENERAL. It is called Multitasking Gestures.

Use different numbers of fingers for different effects.
  1. One finger to scroll up and down and to click on things.
  2. Two fingers to pinch and make something smaller or to move out and make it larger.
  3. Three fingers to tap the screen for it to temporarily enlarge the print. Tap again the same way to return to normal.
  4. Four fingers to scroll up to see what programs are open.
  5. Four fingers and a thumb to close an app and go to the desktop.
Setting up an account

In order to download anything, even free apps, you must have an account with iTunes. This will help you keep track of what you have downloaded so if you lose your device or it gets erased for some reason you can download them again. You should sync with a computer on a regular basis, so that it keeps a record of what you have downloaded.

To get an account:

  1. From your home screen click on settings and then choose store.
  1. Choose "create new account"
  1. Choose your country, then tap "next"
  1. Choose to agree to terms
  1. Fill in your email, a password of your choice, and question to be a password hint. Click next
  1. Put in your billing information. Once it is in there you will not have to type it each time. This info has to be in there even to get a free app.
  1. Click done and check your email account for verification.
After you have verified this you can try logging into make sure it works.


Downloading apps
  1. Find the App Store icon
    The little red number in the corner is the number of apps you already have that need updates.
  2. After you click on it several choices will appear at the bottom of the screen.    
  3. For this example I am going to use Web MD because I have heard good things about it.  Type it into the search window in the App Store.
  4. Notice it is free and has been rated with 4 stars. 
  5. To get it I just click on the word FREE. 
  6. After I click on the word "FREE" it changes into the word INSTALL.
  7.  When I click on the words install app it asks for my password. 
  8. When I put it in the app starts to install. 
  9. You have to put your account password in even when something is free. 
  10. Once I put a password in the app downloads right to my iPad.
Apps to Share

  • Web MD for iPad
  • Crossword Puzzles/Word Search Puzzles
  • Skype
  • AARP magazine
  • Flight Status
  • Silver surf-high contrast
  • Mobile me gallery
  • ABC
  • Netflix
  • NPR
  • Google Earth
  • Pandora
  • Smule Instruments 

    There are so many cool and helpful apps. What is your favorite?