LET'S MEET ONLINE

LET'S MEET ONLINE! Call (512)560-2609 or email helpimnotageek@gmail.com and set up a time for a session. It works really well. We talk on the phone while I see your screen.
Showing posts with label geek. Show all posts

Monday, September 10, 2012

How to Back Up your Computer

The best way to learn how important it is to back up your computer is to lose everything once. Most people have to go through that in order to learn, but not YOU. Starting today you are going to be careful about regularly backing up what matters to you.

WAYS TO BACK UP
1.  Put everything that you want to back up on "the cloud".  A good example of this is Google Drive. The slogan that they use is "Keep Everything, Share Anything". 

This is the easiest way to back up, but remember that whatever is put onto Google Drive is actually being put on a Server (a type of computer) somewhere owned by someone else.

I am very aware that much of what I am working on is already kept on "the cloud". I use Blogger.com to write this blog and so all of the content that is here is kept on a server somewhere that Blogger (actually Google) owns. I also have some pictures online using Flickr and some with Picasa. I often use Google Docs and whatever is done there is "on the cloud".

2.  Get a separate hard drive that you can plug into your computer and create a back up.
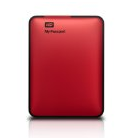
Of course if you back up using a hard drive it is important to realize that the hard drive should be kept in a different place than your computer. If there is a fire and you lose BOTH the computer and the hard drive, the back up will not help much. Some people recommend that you have three copies of everything (a double back up) so that at least one copy will be left if something happens. 


Most computers have a back up utility that will help walk you through the process. It is different for every computer, so I will not try to explain the details of how it works. You can either use the Utility that comes on your  computer or you can purchase a program that will walk you through the steps for backing up. I will give you one example, I use Time Machine on my MacBook.

I have purchased an external hard drive. The first time I plugged it in I opened the Time Machine program on my Mac and set it up to back up on that drive. Now every month or so I plug it in and my Mac automatically copies everything to the External Hard Drive. Time Machine backs up all of my programs, settings and data files on my computer. If something happened to my computer I could remake it with the Hard Drive. I really don't have to think about it much and it is easy to do. If I kept it plugged in all of the time it would do regular backups every hour.

In some computers the Utility (built in back up program) may be confusing, so it may be better to purchase a backing up program (something similar to Time Machine, but for PC) so that it will do the steps for you and make it easier. 

Some recommended programs that you can purchase for backing up your computer are:

http://data-backup-software-review.toptenreviews.com/ - This site reviews the top ten back up softwares for 2012.

http://www.pcworld.com/article/148765/save_your_data_with_one_of_these_top_backup_programs.html
This long URL may need to be copied and pasted into a browser to work. It is an article on PC World talking about 5 of the best Back Up programs.


Some places you can get external hard drives:
Go to these sites and search for external hard drive.
 
Amazon.com - http://www.amazon.com/

Newegg.com - http://www.newegg.com/

Office Depot - http://www.officedepot.com/

Best Buy - http://www.bestbuy.com

External hard drives come in different sizes. Some are in Gigabytes (GB) and some are in Terabytes (TB). All of the drives that I looked at came in at least 350 Gigabytes. That is plenty of memory for backing up most computers. If you are doing podcasts or making movies you may need more memory.

Wednesday, October 12, 2011

Addition to Printing Address Labels

The recent post about printing address labels was from Eileen. She came to me and said that my response was nice, but I didn't understand what she wanted. She wanted to print a DIFFERENT picture next to each address.

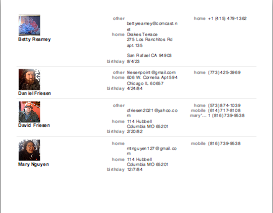
Well, I am not sure if the following information is helpful or not. With the Mac Address Book you can assign an image to each of your contacts. I usually try to take pictures of people that I add into my address book so I have both their picture and their information. You could just as easily put pictures of different flowers or anything you want for each person. The address book will allow you to print a LIST (not labels) which has those pictures showing right next to their phone numbers. For this list each person has their own picture.

When you set it up you have a choice of what information to display. My computer started by just showing the phone numbers, but I was able to add the address, email, and birthdays. There are a lot of other choices. You can see an example on the side. These pictures are tied to the information and so if you delete one of your contacts the image is also deleted. See the link above for more detailed information about creating this. The main thing to remember is the word PRINT! You have to choose that before you can set anything up.

Saturday, October 8, 2011

Merge Labels for Holiday Letters with Pictures

I just learned something REALLY cool about making address labels with pictures with a Mac. It is really easy using the built in Address Book.

1. Make sure that all of the addresses you want to print labels or envelopes for are listed in your Address Book.


2. Open your Address Book and hold down command as you click on the names of the people that need address labels or envelopes.


3. Now you do something that does NOT make sense, but works. You go to FILE>PRINT this is at the top of the screen on the left side.


4. A small window opens up and seeing it you may think that nothing has really happened! Click on the down triangle next to the name of your printer and the window will open up!


5. Now you should see a place where you can set up your labels to look the way you want them to. You could also choose just to print envelopes, lists or an address book.   

6. You can change the font of the label, put a picture on it, and the picture of the font.


7. Choose the layout that you need to have. The program has all of the Avery Labels listed, so you can just look at your box of labels to see what number you need to put in. 
 

When it is all set up all you have to do is to press PRINT! 

Really cool! I may do Christmas Cards after all. 

Friday, October 7, 2011

Basic Email with Gmail

This next week I will be working with some people who are really new to using technology and want to learn how to do email. I prepared a handout for them and so I thought I would share it here also.


EMAIL BASICS

STEP-BY-STEP GUIDE TO EMAILING

We are going to use GMAIL as an example since most email works about the same way. There will be some differences in the way your email looks and works if you use something else.
GETTING STARTED
1.    Go to http://gmail.com
2.    If you have a Google account you can just log in. If you do not have an account you have to choose to create one by clicking on the red button at the top right. Creating one is free.
3.    Fill in the form that comes up.
 You will often see something like this strange word when you are creating an account for something online. If you can type in the letters it means that you are a human with eyes and a brain and not just a computer. If you cannot read the letters you can try your best and it will give you a second chance with a different word OR click on the handicapped sign and hear the letters.
All of this ONLY HAS TO BE DONE ONCE!! Now you have an email account. You should write down your email address and password and keep it somewhere that you will remember.

SENDING A MESSAGE

1.   Click on the button on the left side that says COMPOSE MAIL.
2.   Type the email address of the person you want to write to in the space that says TO. Gmail can also keep all of your contacts, so if you have entered some into it you can click on TO and a list will appear. You can just click on the person you want to write to.
3.   Give your message a subject-this is usually a few words describing the content.
4.   In the big box type your message.
5.   Press SEND. If you do not want to send it you can choose SAVE or DISCARD.
6.   Unfinished email is always kept in the folder called DRAFTS, so if you started one and were not able to finish look there.
All of your sent mail is saved in the SENT MAIL box. This is great if you are not sure if you emailed someone or not or if they want you to send something again that they lost.

READING EMAIL

When you open your email program the first thing you should see is your INBOX. This is the place where all new email goes. Your INBOX shows you who it is from, the subject line in the message and the date that it came in.
New messages are in BOLD. To read you just click on the message and it opens up. After reading a message you can
·      ARCHIVE it-save it, but out of the INBOX. To see it I must go to ALL MAIL.
·      Put it in the SPAM folder by clicking the word SPAM - spam is mail that you do not want to get. The program learns what you put into your SPAM folder and blocks future emails for you.
·      DELETE it-If you are done with this message forever you can delete it. The message is findable for a month or so and then is deleted completely from the server.
·      REPLY-When a message there is a REPLY button on the top right side. Click on this and a new message screen pops up with the message you are answering quoted at the bottom. You can just reply the same way that you send mail.

ATTACHMENTS

Sometimes email that you receive has one attachment or more. An attachment is a separate file that someone has sent you. It is usually a photograph or a document they want to share with you.
Attachments you receive will show up on the bottom of the message. You can click to View them or you can Download them or save them.
You will know that you have an attachment because it will have a paperclip next to the message when it is in your inbox.
If you have something that you want to attach to an email you are writing here are the steps:
1.   Write the email.
2.   Click on Attach a File, which is just below the area where you wrote the Subject of the message.
3.   This will open a window that will allow you to find the file you want to send on your computer. In this example I have saved something to my desktop so that it is easy to find.

IMPORTANT TIPS
  • If you type your email in all CAPS it means you are yelling! 
  • Since you do not have facial features or gestures to see email can often be misunderstood. Reread what you write and make sure it is clear.
  • Only forward email to people that you know might be interested in the content. Too many people forward "cute" things to everyone in their mailbox.
  • There are many places on the Internet where you can get keyboard codes that mean that you are smiling :-) sticking out your tongue :-P and many other things.


All email works about the same way. Here is a simplification:
1.   You send email to a friend.
2.   The email you sent goes to another computer, a server.
3.   Your message is relayed to your friend. Now when they open their email program your message will be there.


Replying works the same way
4.   Your friend reads your message and types a reply. It goes to the cloud
5.   The cloud (server) sends it on to you.
There are two ways that people do email: OFFLINE OR ONLINE
OFFLINE: you are using a program in your computer. When you turn on your computer and go to that program all of the messages that have come in since you last checked are automatically put in your list right from the cloud.

ONLINE: If you do your email online you are actually connecting to the cloud directly. If you use Yahoo, GMAIL or Hotmail this is what is happening.

The main advantage of doing your email OFFLINE is that even though you have to be online in order to download your mail you can read and write even when the Internet is not working. As soon as your computer connects to the Internet again your email will be sent. If you do your email only ONLINE there is no way to access it or to write email if the Internet is down.

Monday, September 19, 2011

Starting a Business? Get a Digital Footprint. Today-Facebook Ads

Last Friday I attended the Women's Entrepreneurial Luncheon. There I heard about and met many women who are at different stages in starting businesses. The panel of speakers recommended several things that relate to technology use. They mentioned knowing both Excel and Powerpoint especially in terms of communicating with Lenders about the plans for the business. They talked about the importance of having a professional looking website and an online presence. Facebook, Twitter and reading blogs were mentioned. It really emphasized for me how much things have changed.

So, this post will focus on Facebook Ads step by step.

I. HAVING A DIGITAL FOOTPRINT
You all know what a footprint is, but you may not have thought about having a digital footprint. This is an imprint of what people can find out about you online. If you Google my name (Janice Friesen) you can find out a lot about me. Most of it is stuff that I have intentionally put online. I recently searched for one of my customers and found out wonderful things about his life and the things he has done.

Your company digital footprint should be something that shows you in a good light and lets your customers know what you want them to know about you. Facebook is just one part of that digital foot print. You do not even need to have a personal Facebook account in order to create a business page or ad.

II. THE FIRST PLACE TO GO
There are very clear and helpful directions for how to do this in the Facebook Help Center. To get to that you go to http://facebook.com and then at the bottom of the page click on HELP. You do NOT have to log in.

III. CREATING A FACEBOOK PAGE OR AD FOR YOUR BUSINESS
You can start with a Business Page OR an Ad. A Page is a place where you can communicate to your customers about what you are doing. People can "like" your page, but it does not give them access to your private information or information about others who like the page. When anyone clicks  "LIKE", a message about your business is posted to their wall stating that they like your business. You also receive an email about their connection to you and there is a number on the page that shows how many people "like" your business.

Facebook Ads is the next step. It allows you to narrow down where you want your ads to show up, what type of people should see them and how much you want to pay for them. You fill in the form for your Ad with a picture, some text and a link to your business webpage or email. The ad will show up on people's Facebook pages as many times as you have budgeted. I set my first one up saying that I would pay $3 a click for up to $12 a day. I targeted Austin, Texas and chose that it go to everyone who was had not indicated that they "like" I'm not a Geek.com yet. Facebook regularly sent me information on how many "impressions" (how many times it showed up on a page) the Ad had and how much I was spending for clicks. I was surprised to have many people that I do not know LIKING I'm not a Geek.com and actually clicking on the ad. Now I am able to adjust the number of clicks or total amount I want to spend a day so that it better meets the business goals. You can even create an ad with a coupon that people can get by clicking the ad. I am just at the beginning of using this, so I cannot say how effective it will be. There is a very similar Ad feature in Google which will bring your ad up to the top of the search results for Google. There is so much to explore and learn!

P.S. A free addition for my faithful readers. In
honor of Talk Like a Pirate day here is a podcast done last year by some cute First Grade student-pirates.


Friday, September 16, 2011

Setting up a Meeting - The Easy Way!!


Recently, I had to set up a meeting for five people who have very different life schedules and also ideas about how to spend time. Here in Austin, TX people live pretty far apart and so if a meeting includes some people who live far north and others who live far south it is best to find a time when everyone is already in a central location. Most of the time I have no idea where everyone lives, so I found a great solution. It is called DOODLE.COM.

Doodle is absolutely free! There is a premium version and other options that cost something, but to create a Doodle and send it out doesn't even require a login. All you need to do is to press the button on the front page that says "Schedule an Event".  Then you list all of the dates and times that are possible for the meeting and send the URL out to the participants.

When they get the email with the URL it takes them to the site where they can indicate which times work for them. As each one fills in their best times you get email notifying you who has responded. In a short time you can easily see what time is best for the majority of the people and send them a note with the final meeting information!  It is SO easy!


One other program that does something similar is EVITE.COM. Evite is a bit more formal and has more information included. On Evite you can create an invitation to an event and people can sign up on a calendar. The best use I have seen of Evite is coordination of meals for someone who has just had a baby or is ill. Without tons of phone calls you can create a calendar that shows what is needed and when it is needed. People can sign up and even indicate exactly what they are bringing or offering to do and so you don't have lots of overlap in people's help.

I think that these two programs are examples of some of the best uses of technology to make our lives easier. Often technology just complicates our lives. It can be frustrating. The learning curve can be steep OR things don't work when you need them to. These two online sites have been reliable and VERY easy to use and saved hundreds of hours.

Monday, September 12, 2011

Google Forms

Google has a whole suite of programs that you can use online called Google Docs. These are very similar to Microsoft Office that most of us are familiar with, but the saved documents are stored on their server (the cloud!) so that you can access them anywhere. They can also be shared so that more than one person can access, read and edit the document depending on how you set it up.

Today I am going to talk about something called Google Forms because it is so cool and easy to use. Google Forms is similar to Survey Monkey or any other type of survey software. You create a form that can be filled out by other people and then the results are collected in one place and you can manipulate them there.

You must have a Google Account to use Google Forms. Once you have one and have logged in you can choose to create a form.

A window will open up where you can design your own form. The form is fairly self explanatory to fill in. You put in each question or statement, directions for those who are filling it out. Choose a question type and put a check to indicate whether it is required.

Google offers 97 different themes so that you can change the way that your form looks.

Once you have designed your form you can choose to email it to the people who you want to fill it out. A window opens up where you can type in email addresses or choose from the contacts that you already have in your Google Docs account. You can also embed the form into your blog or website so that people who go there can fill it out (see the sample at the bottom of the blog and fill it out if you want to!)

When people fill out the form the results are automatically recorded on a Google Spreadsheet that is tied to the form. They see a window allowing them to go back to the form or to create their own form. The spreadsheet looks like this.

You can pull down the Form menu and choose "summary of responses" to see graphs that summarize your responses. You can also easily put formulas into the spreadsheet to average or sum up any numbers in the responses.

I used this for a contest where judges had to score pictures that students drew. Rather than trying to get everyone together at the same time I set up a form and then routed the pictures to each person. They could record their scores on the form and then I could just average the spreadsheet and get the responses right away!

This is an example of an embedded form. Feel free to fill it out. I will receive the feedback!:


Tuesday, August 30, 2011

Embed Code

On Flickr, YouTube and many other sites you get the choice to use "embed code" in order to put any media (picture, video or audio) on Facebook or another website. Here are the steps for using the embed code:
Go to the site that has the picture or video you want to use. To find the embed code choose SHARE. You will be given a choice to post to various places or get the link to copy and an embed code (on Flickr it was called HTML or BBedit code). Copy the embed code.  


    Go back to the page you want the media to be on. To go back to the place that you want the picture to show up, choose EDIT HTML or whatever you need to do in order to edit the code. You can guess where you think the picture should go by looking at the code on the page. It includes the words that are on the page, so if you do a search (CTRL-F or F3 on a Mac) for those words you can paste the code directly into the HTML. Here is an example: (I searched for the words "Here is an Example:)

    Hephaistos Temple
    When I pasted the code into the HTML on my blog this is what actually showed up!
    Now you can save, publish or preview to see that the picture or video that you wanted to show is now on your webpage.

    The reason to use embed code is that the picture STAYS on the site where it was originally and you just put in a pointer to that place. When someone looks at your page the computer automatically gets the picture or video from the other place and puts it on your page.

    Tomorrow we are back to Facebook!

    Monday, August 29, 2011

    Detour from Facebook-Video, YouTube, Vimeo and others

    Last week I was in California helping out my Mom and so I didn't write all of the posts I was planning to about Facebook, so we will have to come back to that.

    Today's post is about video. I was motivated to write it because a professor I know asked me about posting his lectures on the web. Since I had to look up and try things I thought it would be a good topic to share about. I hope I will be able to do more writing about issues people ask about as time goes on. This is especially for my teacher friends who might want to do something, but have no time to figure it out.


    SHARING VIDEO ON THE INTERNET
    First of all video files are HUGE. The size depends on what resolution the video was taken at. High resolution videos are the best to watch on your big screen TV or to submit to festivals like Sundance, but if you just want to put your video on the web so that someone can see it there are lots of options. Each of these sites resizes your video automatically to make it perfect for viewing on a computer screen.  They also provide embed code (We will have to talk about that tomorrow) so that you can put your video onto your blog or website.

    http://www.youtube.com
    The best known and most used video site is YouTube. There are videos up on YouTube on every topic you can imagine (and some that you can't even imagine). If you want to post a video to YouTube first you need to sign up for a free account.

    Next set up your own channel. You can use your channel as a place to collect videos that you like as well as a place to get to all of your own videos easily.

    When you first get to your channel page you will have lots of choices. You can make it look the way you want it to look.

    At the very top of the screen you will see the word UPLOAD. When you have a video that you want to put onto your channel click "UPLOAD" and you will be walked through all of the steps.

    Be sure to set the privacy settings that you want. YouTube offers three settings:
    Public-Anyone can see your videos and searches can find them.
    Private-You can share your video with ONLY 50 or fewer people who already have accounts with YouTube.
    Unlisted-Only people who have the link to the video can view it. The number of people is only limited by your sharing. People who you share the link with DO NOT have to have YouTube accounts to watch the video.

    There are many other video sharing sites and they all work in about the same way. There are a few differences and I will list the ones I know about and their differences here. It is not meant to be a comprehensive list, so if you have one to add it will be welcome.


    Vimeo emphasizes quality and creativity. It was made by film makers and can work with HD video. There are Video classes on the site if you want to learn more.
    Privacy: Public, Only Moderators can view (you need to enter their emails), Password Protected-people do not need an account, but need the password to view the video.
    http://vimeo.com


    YouTube created for schools. This has different settings for students and teachers allowing teachers to do more.
    http://www.schooltube.com/

    http://www.teachertube.com/
    Similar to SchoolTube, but created with teachers in mind. Today when I looked at it the site was extremely slow, so I don't have privacy information.

    Surprisingly I could not find a site for professors to upload their lectures. There are LOTS of sites where you can go and watch the top professors in the world lecture and there are online classes, but not an upload site! One other thing I learned is that you can actually watch MOVIES on YouTube. They cost $1.99

    I am sure there are other sites out there, but these are the ones that I know about and that are FREE
    I hope people will add comments if they know about other places.

    Wednesday, August 24, 2011

    10 Essential Privacy Settings on Facebook

    As I was writing this I took time to look at all of the privacy settings on Facebook. I came away thinking that I have a lot of control of what I want to share and what I want private. I also felt a little strange about how many privacy choices there are and how easy it is to miss some of the settings that seem important.  An article from mashable.com really helped me to figure out some of the most important settings.

    Facebook privacy settings
    http://mashable.com/2011/02/07/facebook-privacy-guide/

    1. Sharing Settings:
    Account > Privacy Settings > Sharing on Facebook
    Facebook allows you to set your sharing settings so that everyone, friends of friends (this means that your friends can see your content and THEIR friends can see them also) or only friends can see your content. Each item is listed and you can either set them all the same way or do a custom setting where  each one has different setting. If you do not indicate what you want it is possible that some of your content (pictures, status updates, etc...) will be seen by friends of your friends. This could be a LOT of people that you do not really know.

    2. Existing Photo Settings:
    Account > Privacy Settings > Sharing on Facebook > Customize Settings > Edit album privacy for existing photos
    It is really important to make sure to set the privacy settings for your existing photo albums. As you create each album you choose what level of privacy it should have. However, your existing albums are probably all set as viewable by everyone. When I went in and checked mine were.


    3. Friends Checking you into Places:
    Account > Privacy Settings > Sharing on Facebook > Customize Settings > Friends can check me in to Places
    If you do not want someone else notifying the world where you are you may want to be sure to change this setting.
    It lets your friends check you in to Places. "Having someone else telling the world where you are can be unpleasant and even dangerous in some cases. If you want to avoid it, disable this feature."

    4. Connecting on Facebook 
    Account > Privacy Settings > Connecting on Facebook
    These settings determine how people can find you on Facebook. Can anyone search for you? Are your listings open to everyone? 

    5. Apps You Use
    Account > Privacy Settings > Apps and Websites > Apps You Use
    Facebook is full of additional apps (or applications). For example Yelp, Pandora, etc... Each one has its own privacy settings. Either go to each one and be sure that you are in agreement with how they are sharing your content or remove them and only keep the ones you use regularly.

    6. Instant Personalization
    Account > Privacy Settings > Apps and Websites > Instant Personalization
    This allows third party companies to access your information so that they can tailor their information to match your interest. I think this is sort of spooky and also sort of amazing. These sites can only access information that you have marked for public sharing.

    7.  Info Accessible through your friends:
    Account > Privacy Settings > Apps and Websites > Info accessible through your friends
    You may think that you have set all of your settings so that only your friends can see what is there, but until you have gone to this level and indicated which information can be shared through them you are not done with setup. I was pleased to see that the default was that NO information was shared and that I had the choice to add specific things to share.

    8.  Public Search
    Account > Privacy Settings > Apps and Websites > Public Search
    Do you want people to be able to search for you through Google or another search engine and find your Facebook page? They will still have to request to be your friend, but you can set it up so that your profile does not even show up when someone searches in Google or other places.

    9. Friend Lists
    Friends > Edit Friends > Create a List
    You can simplify setting up your privacy settings by creating lists of friends that fall into different groups. For example: family, work friends, childhood friends, etc...  You can then set up privacy settings that apply to a group rather than an individual.

    10. Using HTTPS
    Account > Account Settings > Account Security > Secure Browsing (HTTPS)
    Now go back to the main page and choose Account>Account Settings rather than Privacy Settings. There is a setting called Account Security. It talks about secure browsing with HTTPS.  HTTPS is a programming language behind Facebook that will make it more difficult for anyone to hack into your account. It is recommended that you choose this setting to be more secure.

    One problem with these settings is that they keep changing. Keeping up with new ones can be a problem. Even now there is a warning that appears on top of the privacy settings:
    I have decided to do the best I can to set up my privacy settings so that they work for me. I know that they are not perfect, but the benefits of using Facebook in my opinion outweigh the questions of privacy. I know and respect that everyone does not feel that way and so each person has to decide for themselves about this issue.