LET'S MEET ONLINE

LET'S MEET ONLINE! Call (512)560-2609 or email helpimnotageek@gmail.com and set up a time for a session. It works really well. We talk on the phone while I see your screen.

Monday, December 9, 2013

When I change internet providers Do I need to change my email address?

INTERNET PROVIDERS

Recently a client of mine moved.  Because the client was now living in a different part of town the internet provider was different. The internet provider is usually the company that installs cable or your telephone as well as giving you internet service. 

My client's email address was the one that came with the internet provider. The change of providers meant a change in email address also.

Providers give email addresses to their customers for free along with the internet service. That means that they host an email server where all of your email (sent and received) is stored. If you are no longer their customer you must sign up for a new address either with your new provider or with one of the free online providers; Gmail, Yahoo, Hotmail, Zoho.  There are more listed here:

http://email.about.com/od/freeemailreviews/tp/free_email.htm

CLIENTS

It is easy to be confused about email online and email clients. A client is the program that is ON your computer that lets you read your email without going through a browser like Firefox or Internet Explorer. Some common clients are Mail (on the Macintosh), Outlook, Entourage, Windows Live Mail, and Thunderbird. These programs will go and get your mail, put it on your computer and also send your mail from your computer. 

It is handy to have one of these programs in case you are somewhere that does not have an internet connection. Using one of these programs without an internet connection you can read any email that was downloaded when you last were on the Internet and you can write email or replies. Anything you write will not be sent right away, but the next time you can connect to the internet they will send automatically. Until they are sent they sit in your inbox and wait.

When I don't have an internet connection and try to go to gmail to get my mail this is what I see.


I cannot even read my old email messages. I could write email on Word or another word processor, but I would still have to create a message, copy, paste and send it when I am on the Internet again.

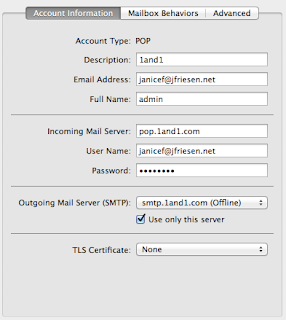
An email client needs to be set up to connect to your internet provider so it knows where to look for your mail. Each provider has different information that you need to set a client up. Search online for your internet provider and look for information about setting up an email client. It should tell you the POP or IMAP server (that is the computer for incoming mail and the SMTP server (that is the server for sending, or outgoing, mail). You can then go to the settings in your email client and enter this information. It should make the client work!
A FINAL WORD

It can cause a lot of frustration to change email addresses. After thinking about this for a while it seems to me that the best way to go is to get a free email address from Gmail, Yahoo or one of the others. Then if you change providers you do  not have to change your email address!


Monday, December 2, 2013

Things to do with Word You Might not Know About


Microsoft Word is probably the software that almost everyone uses and associates with using a computer. Microsoft Word 2013 adds some important features. You can try these features on other versions, but they may only work on MS Word 2013.


Only in Microsoft Word 2013 - Edit and save PDFs directly in Word. If you have a .pdf document that you want to edit first open up MS Word 2013 (you have to upgrade if you have an earlier version). Then choose FILE>OPEN and find the .pdf. It will open in Word and you will be able to edit it and then Save As .pdf. It will save your changes!


These are TABS
If you like using TABS to switch between windows in a browser, now you can do the same thing with different documents that you have open at the same time. Just download this free add on. It will work with older versions of Word. If you have Microsoft Word 2013 you will have to purchase a $25 copy.


Use different Key Strokes or clicks to easily select different amounts of text. Triple Clicking anywhere in a paragraph selects the whole paragraph. Control Clicking anywhere in a sentence will select the whole sentence. Holding the Alt Key and Dragging your mouse over any rectangular space will select the specific text that you drag over.

Microsoft Sky Drive is the place that Microsoft has created for saving things online. If you have images saved in this location and are using Word 2013 you can choose pictures directly from the Sky Drive to put into your document.

Have you ever seen a document sample with "lorum ipsum...... " latin words? Those are place holder words which help you to visualize what a document will look like after you replace those words with your own. With Word 2013 you can generate your own placeholder text. When you are in a document type =rand(p,l) and press enter. The p stands for paragraphs, so you put a number instead of the p that indicates how many paragraphs you want to generate. The l (L) stands for how many lines you want the paragraph to be.

Words dictionary - You may not realize that when Word does a spell check it is checking words that are already in its dictionary. If you want more words in the dictionary you can add them one by one. If you type in a word that the program thinks is misspelled, but you know it is correct you can right click the word and choose "add to dictionary". That word will be added and it will not show up as misspelled any more. You can also download Bing's Dictionary for Word 2013. If you have Word 2013 you can go to this link to download the add on. http://office.microsoft.com/en-us/store/bing-dictionary-english-WA103136166.aspx?redir=0

Toggle between word cases - It often happens to me that I leave my caps lock on and find I am typing all in caps when I did not mean to be. The other side is that sometimes I am done typing, but decide that a word should be Capitalized or in all lower case. After highlighting the words you can just click SHIFT and F3 at the same time and it will toggle between ALL CAPS, Camel Case (Where The First Letter Of Every Word Is Capitalized) and lowercase.

Recover Unsaved Documents - Have you ever experienced the horror of closing a document you were working on and then realizing that you had not saved it? I think we all have.  In Word 2013 click "File" and then "info" and then "manage version" and you will have a choice to "recover unsaved documents". Click on that and then find the one you want to save and do that right away!

These ideas come from:

http://www.cmitsolutions.com/corporate/blog/10-tips-tricks-apps-and-add-ins-supercharge-microsoft-word#list

Wednesday, November 6, 2013

Safe Holiday Shopping on the Web

It is easy now to sit at home and shop online. You can go to almost any store, small businesses or even people selling on eBay or Craig's List. There are just a few things that you need to know when you are purchasing items online:

Where are you when using your computer?

You should never shop or bank online when you are using a public Internet connection, even if it has a password. You don’t know who else has access to that same network and can hack into your computer.  Keep actual purchasing to when you are at home on your own password protected network. If you have a WiFi network at your house that is not password protected you need to find someone to help you set up a password as soon as you can and do NOT do anything financial online until you have that settled.

Is it safe to use my Credit Card online?

Safe use of Credit Cards online is a huge issue for anyone who sells or buys online. It is nice to know that it is as important to the people you buy from as it is to you.  The Marketing Industry has come up with safety standards called “PCI Safety Standards”. These tell a merchant what they need to do in order to be in compliance and has a system for regular review of sites.  Larger companies must be compliant with these standards or they are fined a great deal.

It is more difficult for small businesses to keep up with the standards, comply to all of them and to keep up with a regular audit. It is not unknown for them to “white” lie when asked if their security system is up to date. For that reason when purchasing on a small business it is best to use a company like PayPal to handle the Credit Card transaction. 


Is it a reputable site?

This can be tricky. Often you can look at the URL (website address) to get some idea. For example http://target.com takes you to the Target website,
but http://target.org takes you to a totally different looking site that does have choices for clothing, cell phones, and kitchen among other things. People buy these URLs and put up a page hoping that people will access the page by accident. Because they have advertisements on the page they get income every time someone accidentally goes to the site. 
Sometimes sites actually LOOK very similar and it is hard to tell the real one from the fake one:

The World Trade Organization was spoofed by critics of the organization. If you look at http://wto.org you will see the actual World Trade Organization.

Go to this site and see how it looks. It is easy to confuse it with the site below. Click on the link and see the similarities and differences. 

But if you search for World Trade Organization there is also one called http://gatt.org. GATT is an old acronym for the WTO and the site looks VERY similar. You have to read carefully to see that actually there is no way that the second one could be an accurate site. The first article title should lead you to ask questions:

"WTO Announces Formalized Slavery Market For Africa"
This same thing happens in email also. Sometimes questionable emails are even from people who I know!  I have learned that if I ever get email from anyone that does not have a meaningful subject line (it has Hi, or something pretty meaningless in the subject OR if it is an empty message with only ONE link saying something like “check this out” I immediately delete that email. Often the email box of a friend has been hacked and someone is sending things out in their name.


The one RULE to FOLLOW is easy. 
If you have doubts-don’t do it!!   


Safe Searching (search engine)

There are several special search engines for shopping online.  The one rated the best is Google Shopping http://google.com/shopping.  

When you go to the website it highlights the newest, and best offers that they have today. They regularly post pictures of the newest, best sellers. 

If what you are looking for is not on the main page all you need to do is to search. When you search a huge list of results come up. You can sort them in anyway that is useful to you. You can sort by highest price, lowest price, or review score. 

There are many of these Shopping Search Engines.  Some of them are for pay. You get an account with a password and then you can 

Other Shopping Search Engines to Try


Bing Shopping http://www.bing.com/


And there are many others!


Look for reviews before you buy

Go to your favorite browser (Chrome, Firefox, Internet Explorer, Safari)

Type into the search bar an item you would like to purchase and add the word “review” at the end. 

The results that come up now are reviews of the item that you are thinking of purchasing. I usually read through a few of them to take note of the quality of the item and if it was what it sounded like online after it was delivered. You can also find out if people had difficulty returning items. This could save you headaches in the future.

BROWSING ONLINE

Browsing online is always safe and does not cost you anything. You can learn a lot about products and enjoy looking even at things you do not want to purchase. 

Remember that all of your moves online are kept track of by someone. This is not all bad. It is supposed to make it so that the ads that appear when you are on a site with ads are ones that you might be interested in. This keeps you from getting offensive ads. If you don’t like someone knowing anything about you it is probably better to stay offline.


BONUS SECTION:  Shopping on eBay
  1. Open up a browser (Internet Explorer, Safari, Chrome, Firefox)
  2. Type in “ebay.com” in the location space and press enter.
  3. In the top left look for Sign In or Register.
  4. Choose Register.
  5. The webpage will ask a small amount of information and you will create a password. Since you may spend money on this account you will want to make it a unique password.
  6. Safe passwords have
    1. 8 or more characters
    2. Is not the name of your pet or your address
    3. Uses at least one number and at least one capital letter (probably not the first letter because you want it to be hard to guess)
    4. Can also use a symbol like - _+= 

Now that you have an account you can sign in:

On the home page there is a space that says, “I’m looking for...” Type in what you are looking for in this slot.

I am looking for a bathroom scale for my husband for Christmas, so I will type that in.
It came up with over 2000 results.  I can narrow my search by choosing digital or analog, upright or floor, etc...

Up front you are told the Shipping fee. Some are free and others have an amount for shipping. 

You can Buy it Now without bidding on an item and having to wait to see how other people bid.

When you choose an item it gives you lots of additional information:

  1. Item Specifics-This will let you know if it is brand new, or if it has been used and what condition it is in.
  2. Description - More details written by the seller.
  3. Shipping, Payments, Returns - Spells out what is expected in these areas for the person who purchases the item. 
  4. Seller Info - This tells you their Seller ID, what percentage of positive feedback they have had. If you scroll down you can see more details and how their ratings break down. If there is a rating you want to find out more about you can click on it and the whole list of the actual reviews of the seller will show up.

Sunday, October 27, 2013

Watching TV and Movies with your computer

Do you remember when you got your first TV?  Remember how you had to get up every time you wanted to change the channel because no one had invented the remote yet? There weren't that many channels to choose from. Now we have remotes and too many channels, but I find that often when I want to watch there is nothing "good" on.

Things are changing! Now it is easy to watch what you want, when you want to watch it. If you have DVR you can record your favorite shows and watch them at a convenient time.

So, why I am I writing about TV and DVR when this blog is about technology tips? It is because I never have gotten a DVR and I am even thinking of getting rid of cable. I have learned that I can easily watch shows from my computer on my TV. The following gives you a step by step guide of how to do it and then several places you can go online to find free or paid shows. 
HDMI PORT

Hooking your computer up to your TV

Do not be afraid of this!  It involves cables that you may not have seen  before, but you can get them at a Radio Shack or Best Buy with the help of the sales person. This is easiest to do if you have a laptop or even an iPad or other tablet, but it can be done with a desktop computer. The computer will need to be near the TV or have really long cords.

VGA PORT
1.  Check on the back of your TV to see what ports you have on it. You will need to plug in BOTH the sound and the picture.


SOUND CABLE
2. The sound will be going out of your computer and then needs to be plugged into some sort of speaker. For mine I just use speakers that I use for my computer to play music.
SPEAKER


VGA CABLE

HDMI CA
3. The picture can come through either VGA or HDMI cords. Check to see what you have on the back of your computer. Newer TVs will have both choices. HDMI is high definition, so it should be your first choice. VGA will also work well.


ONE TYPE OF VGA ADAPTOR FOR MAC

So, you will need two cords and maybe an adapter depending on your computer. For a Mac either VGA or HDMI will require an extra piece of connector to go between the HDMI or VGA cord an the Mac. Newer PCs will have both an HDMI port and a VGA port. There are different adapters for iPads and other devices. Look at the ports on your computer to see which ones you have

ADAPTER FOR MAC CONNECTED TO VGA CABLE

Now your TV is hooked up to your computer. You will need to let your TV know which input you want it to look for. I have to change mine to PC. It then looks for the PC and displays the screen that is on my computer.

The next thing is to find shows that you want to watch. The following links will take you to lots of possible places to find TV shows. You can skip the TV and watch them on your computer or tablet. It is much more fun though to run them through your TV and watch them on the big screen.

MEMBERSHIPS

Netflix and Hulu are two of the most popular sites for subscribing to TV shows or Movies. With both of them you pay a certain amount each month and then you can watch as much as you want from their sites. When you set it up you get a login and a password that you must enter in order to access your account.

Netflix has two different plans. One is streaming video. All of the shows and movies that are available can be used right away. The other plan is borrowing CDs. I will not go into that since it is not the subject of the blog post.


OTHER PLACES TO FIND SHOWS

Crackle
Crackle by Sony is limited. There may not be full seasons for some shows, but there are many that are free. You will have to watch some ads and it does not seem to be something you can avoid.

TV.com
Reviews, discussion forums leads to full episodes that reside other places like Hulu or Netflix

FreeTVHub.com
International channels, less popular programming

Hitbliss.com
This sounds like an interesting new idea. It is sort of a pay as you go system where you pay by watching ads. 

Television networks (FOX, NBC, ABC, PBS)

Amazon Prime

WHAT ABOUT THE REMOTE?

If your have an iPhone you are in luck.  There is an app called Mobile Mouse which allows you to manipulate your computer using your iPhone. It also works with an iPad or iPod. You download the app to your iPhone and then another app onto your computer that makes it into a server for the app. Your iPhone uses WiFi and works just like a mouse with your computer!

There are other options for the Android. I have not tried them, so I cannot speak to them though.

Thursday, October 17, 2013

Using YouTube to Learn

Last week I worked with several people who wanted to know more about Excel. I know the basics of Excel and use Spreadsheets regularly. I use the basic formulas and often use it as a fancy table.

I am comfortable using Excel 2003, but it has changed quite a bit.  It still does the same things that it did before, but it has a new ribbon menu that is confusing to me.  I could get used to it. I just need to take time to practice and use it.

So, I decided to learn on YouTube. YouTube has short videos on about anything that you would want to learn as well as lots of entertainment videos. Here is what I did:

1. I opened up Excel to a blank page.

2. I opened up a browser (Internet Explorer, Chrome, Firefox, or some other program that will get me to the Internet) and went to YouTube

3. I right clicked on the task bar (the bar across the bottom of the screen) and chose to show the windows side by side so that  I could see both of them at the same time. You can set up the windows to cascade,
show stacked or side by side.


4. I searched on YouTube for what I wanted to learn. I started out by just typing Excel in the search window and then selected videos that seemed like they might be helpful.


5.  I ran the video and paused it to try things out using the Excel program that was open on the other side of the screen.

6.  If there were things that I already knew in the video I fast forwarded past them by dragging the scrubber to the next point in the video that had something of interest.

My Favorite was How to Demystify the Ribbon because it went over using the ribbon in an organized and helpful way.


Monday, October 7, 2013

Fun with Photos

Today I thought I would share with you something that is just for fun.  I started by doing a search for "fun with photos". I chose the first result since it matched what I was looking for.

The one I chose is called Photo Funia. I like this site because there are a lot of effects to choose from and I like the way it is organized.


First you choose an effect that you want to use on your picture. You can either choose an effect from the samples or you can go to the list to get specific types of effects. 


Next find a picture that you want to work with. Here is the picture that I chose. It was in iPhoto and so I exported it to the desktop using FILE>EXPORT. This makes the picture smaller so that it can be used easily.


Click on the Choose Photo Button and upload the photo you chose and change the title underneath the picture. 


Depending on the effect that you have chosen a different part of the picture will need to be selected.


Photofunia


http://photofunia.com/


Thanks to the Hongkiat blog for leading me to this site. This is a great place to look if you are interested in more sites like this one.

Monday, September 30, 2013

OK I'm ready for an iCalendar, now what?

There are so many different types of calendars and devices to talk about and I am not an expert in all of them, so this time I will tell you a story about how I solved my calendar problems and then give you a few tips about how to export a calendar from one type of online calendar and import it into another.
If this does not answer your questions maybe the links below will help you. You can always go to Google and just type in your question. Most often a lot of links will show up with discussions from people who have had the same problem as you have and often there is a solution you can use.

Using the Calendar in iPhone
I started by using my iPhone Calendar regularly. All of my appointments were on my iPhone. Here is what I do.
1. Click on the Calendar icon on my Phone.

2. Find the date that I am wanting to put something onto. This has changed with OS 7.  Here are some screen shots of how I go through it.
  • Click on Today in the bottom corner to get back to today's date. 
  • Click on the name of the month at the top of the page and scroll down to find the month that I want.
  • Click on the calendar of the month that you are wanting.
  • Click to choose a date that you want to put something on.


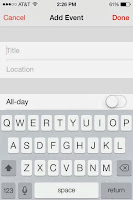
  • Click on the + at the top right side to add an event. 
  • Fill out the event information (remember that there is more you can put in if you scroll down)
  • Click on DONE on the top right when you are done.
The Event Details will appear. It will show what you have put in as well as which calendar it is on.

To Delete an event click on it and when the Event Details appear click EDIT on the top right side and scroll down until you see the red delete button. Click it and the event is gone.

Syncing that Calendar with the Google Calendar
Now that I had the events on my iPhone I wanted to be able to see them on my Google Calendar. I can get to a Google Calendar where ever I am, even without having my own computer. There were two things that I needed to do in order to make my events show up on Google Calendar.

1.  I followed the directions on this link: https://support.google.com/calendar/answer/151674 which made sure that my Calendar was set up correctly. I named the calendar that I wanted to sync "Google Calendar" and gave it a different color than other calendars so that I could see what was happening.

2.  I went back to the calendar on my iPhone and went to the appointments that I wanted to show up on the Google Calendar. I clicked on the event and on the event details looked to the part that told me which calendar it was on. Most of mine defaulted to HOME and had blue dots, so I clicked on the word HOME and switched it to Google Calendar.  When I changed the Calendar they began to show up on my Google Calendar on the computer.


Sharing Calendars with Other People
I thought it would be good to have my husband's events on my calendar so that I could keep up with what he was doing. In order to do that in Google

  • On the computer open up and sign into your Google Calendar
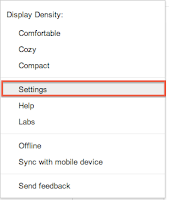
  • Click on the Gear on the top right side and slide down to the word SETTINGS
  • Click on the tab at the top that says CALENDAR
  • Click on the link under Sharing.


  • Look for Share With Specific People.
  • In that box type the names of the person you want to share your calendar with. 
  • You can share your calendar with more than one person.

  • They can opt to have your calendar show in a different color on their calendar or not to show. 
Finally, How to Export and Import your Calendar
This may help you if you want your events to go into a calendar that is not compatible with the Google calendar or another calendar that you have. Instead of using SAVE like you do with a document you choose EXPORT. 

EXPORT is usually found under the File Menu, but in Google Calendar it is in the settings.

This exports the file into a format that can be opened by most calendars. One of the formats that is used is .CSV It cannot be clicked on and opened up as a calendar (it may open, but will look like a mess or not open at all. What you need to do is to IMPORT it into another calendar program.

Open the other program and under file look for the word IMPORT. When you choose IMPORT a window opens like when you want to open a file. Find the file that you just EXPORTED and choose it. The calendar program will open it up and you should have all of your calendar items on the new calendar. 

This can also be done with your CONTACTS or ADDRESS BOOK. With most programs you can EXPORT your contacts and then IMPORT them into another address book program. 

IMPORTANT NOTE - This is not the same as syncing your calendar or address book. You are only moving over the things that were entered in the past. It will not continue to update as you update the old one. 

OTHER RESOURCES

Google Support
https://support.google.com/calendar/answer/151674?hl=en

https://support.google.com/mail/answer/3008051

About.com
http://email.about.com/od/googlecalendartips/qt/Sync_Google_Calendar_and_iPhone_Calendar.htm

Digital Trends
http://www.digitaltrends.com/mobile/sync-multiple-google-calendars-on-iphone-or-ipad/

Monday, September 23, 2013

iPad: Transferring Docs to Mac and Back

Occasionally I have worked with people who have Pages both on their Mac and on their iPad. It only costs $9.99 to put Pages onto your iPad. I had version 8 when I started and was not able to transfer documents. You must upgrade to version 9 in order to transfer documents. When I did that it automatically upgraded the copy of Pages on my Mac. I didn't know it would do that, but it did!

The process for adding pages from your computer to your iPad follows:


    • Go to iTunes on your computer. 
    • Plug in your iPad.
    • Select your iPad in iTunes and select the apps section at the top.
    • Slide down the page until you see Pages under File Sharing and click on it.


    • Click on Add at the bottom of the page.
    • Find the document by following the path on your computer.
    • When you click on it you will see it added to your list in the iTunes Pages list.
    • Now go to Pages on your iPad
    • Click on the + sign.

    • Choose “copy from iTunes”
    • When you see the document that you want to import to your iPad click on it and it will be added to your iPad. You must have iWork 09 on your computer or this will not work, even if you have iWork 09 on your iPad.

Here are the instructions about moving the files from Pages on the iPad to iTunes and finally saving them on your machine:

    • Open up Pages on your iPad Select the document you want to move and open it.
    • When the document is open click the wrench on the top right corner.
    • A window will open. Choose “Share and Print”
    • That will open a new list. Choose “Copy to iTunes”
    • Now plug your iPad into your computer and choose which format you would like to transfer (pages, doc or pdf)
    • When you choose the file will automatically be transferred to your computer.  In order to see it you have to open iTunes.
    • Click on the Apps category at the top and slide down the whole page until you see Pages. 
    • Click on Pages and a list of the documents that you have transferred will appear.
    • Choose the document that you are interested in having on your computer and click “save to” at the bottom. 
    • A window just like most save windows will open and show your folders on the computer.  Choose the one you want to save it to and click Save to.
    • Now you will be able to open it up on your computer.

This is a lot of work to go through if you have lots of documents to transfer. You may want to consider using the cloud in order to keep your file system and import all of the files at once. Here are steps to do that:

    • To Set up iCloud go to Settings on your iPad.
    • Click on iCloud on the far left list.
    • Sign in with your account.
    • Use the sliders next to each of the apps to show what you would like to sync.
    • Make sure that Documents and Data is turned on.
    • Scroll down to Apps on the left side of the settings window and tap Pages
    • Slide “use iCloud” to ON.

To put new folders on your iPad in Pages: 

First hold your finger on a document you want in a folder until it wiggles. Then drag this document on top of another one that you would like to have in a folder. A window will open up with Folder 1 as a name. You can type to replace the name with a new name.
 

I learned most of this from: